![]()
NOTICE: One year update at the bottom of this post. Please read before starting!
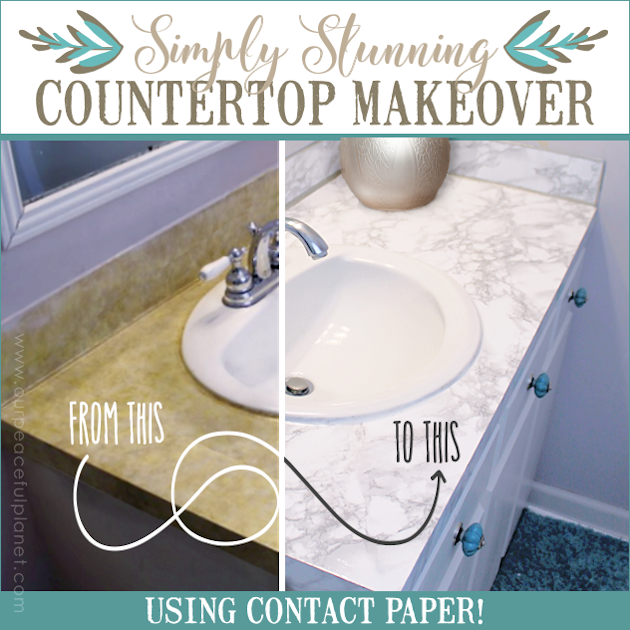
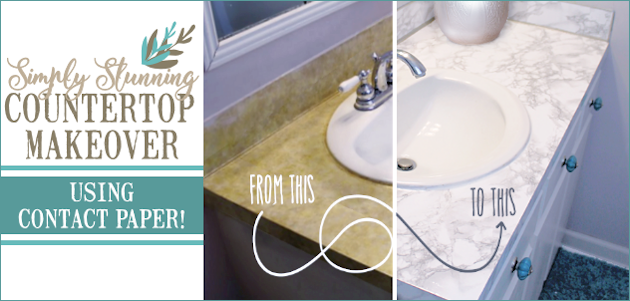
Doing a contact paper countertop makeover has been a popular way to inexpensively cover up an old ugly countertop. Granite contact paper is typically used as it resembles a real granite countertop and while if done well it looks awesome, this comes with a variety of inherent problems. Well, we’re going to show you how to fix almost all of them on one fell swoop! And if your looking for other great inexpensive fix-up ideas check out our Frugal DIY Bedroom Makeover Ideas and our Classy Living Room Ideas on a Budget.
We also did a full makeover on our master bathroom complete with recovering the counter with contact paper.
Make sure you check that out too>>>>>> Magical Dark Sea Bathroom Makeover
PROBLEMS WITH A CONTACT PAPER COUNTERTOP
- Seams. There’s no way around having seams and even with pattern matching they tend to show. With granite paper you can’t match patterns and they show up more. Accept it.
- Water can get under the seams. If it does, they will start to peel up.
- It’s easily damaged because, well, it’s paper. In a kitchen you can’t cut on it or put anything hot on it. In the bath room no curling irons can touch it.
- Edges peel up. If your countertop has a straight edge as the one shown below, the paper will peel away easily where it meets together when anyone rubs against it.
- Be careful. You just have to be careful because it can be nicked with anything sharp or discolored easily.
Those are some pretty big issues considering all the work you go through to put the stuff on. And it does take a good bit of work. But we found a way to make it more sturdy and long lasting. You still can’t set extremely hot things on it or cut on it but water and peeling should not be an issue which is the biggest problem in a bathroom.
NOTE: This is best done in bathrooms mainly because you can’t cut or place hot things on it even with our method. However, if you’re really careful in your kitchen, go for it!
 How To Make a Contact Paper Countertop Last
 Water Based Polyurethane Gloss Finish. Because it’s water based it doesn’t harm the contact paper. It seals over the seams and edges so water cannot get in. It protects the surface and all your hard work. The only type I found is linked below and made by Rust-Oleum. A little goes a long way. It’s a bit pricey but we use it for all types of things such as my post on how to build a Large Surface Home Office Desk. Buying it in the two quart package can save you almost $15. This is of course optional. You can just treat your contact paper with great care. But if you have kids or just don’t want to worry about being extra careful you don’t have to use it. But if you have edges of your counter like mine, I’d still suggest gluing them somehow as they will find a way to peel just from leaning against them.
FYI This does make it more of a permanent thing. You cannot easily remove the paper later. You would have to do some light sanding to get through the gloss.
Contact Paper Countertop Supplies
NOTE: Once companies realized people were using granite contact paper to cover counters they raised the price of that type so its a bit more costly. Buy enough to cover your counter. If you’re using a pattern that you can match you’ll need more. One roll “barely” did my small countertop.
- Granite Contact paper or other Paper of Choice.
- X-acto Knife
- Yard stick
- Vinyl Squeegee or something with a very smooth edge to press with. A credit card works!
- Scissors
- Rust-Oleum Polyurethane Water Based Gloss Finish Heavy Use (This is the best deal by far) Single Quart Normal
- Good quality paint brush or foam brush. If you’re doing a larger area you might use a foam roller.
Time Frame
 This job could be done in a day and ready to use the next day but you’d need to start early to allow yourself to get all the coats of varnish on.
How Long It Took Me
(I’ve never done this before.)
Covering small bathroom vanity: 2 Hours
Clear Coat: 1 day due to drying time of 2 hours in between each of three coats.
Download Reminders
Should you decide to not use clear varnish grab one of our free reminders to print and/or frame and set on your countertop! Photos of them printed up are at the bottom of post. Various sizes!
Instructions
- Scrub and clean your countertop thoroughly and wipe with a clean dry cloth. You want to make sure there is nothing left on it to make the contact paper not adhere to the surface.
- Having someone to help makes it go much faster and makes the paper easier to handle.
- This project takes patience. If you hurry it up you’ll mess up.
This is what our bathroom looked like before we repainted our walls. The house must have been a rental because at some point they had painted over wall paper. Sad but true. For the moment we were looking for a quick fix up so we did a little sanding and hole filling and added a new coat of paint. Eventually we’ll redo the entire bathroom the “right” way and also replace the vanity but for now we were looking for a quick inexpensive facelift.  The walls had been painted here. But the counter top still needed some work. It appeared that some past owner had also painted the countertop. It wasn’t too bad of a job, however, they went over everything including the part of the back splash that was metal.
 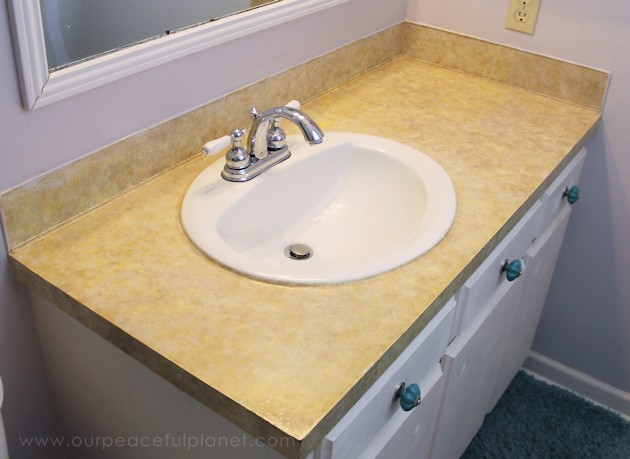 I debated what to do and finally decided I would paint the metal parts metallic silver.
  I chose Martha Stewart’s metallic silver as it’s close to the real thing.
I masked off everything with painters tape.

I probably didn’t need to do the inside parts as those would be painted over anyway but I was thorough. 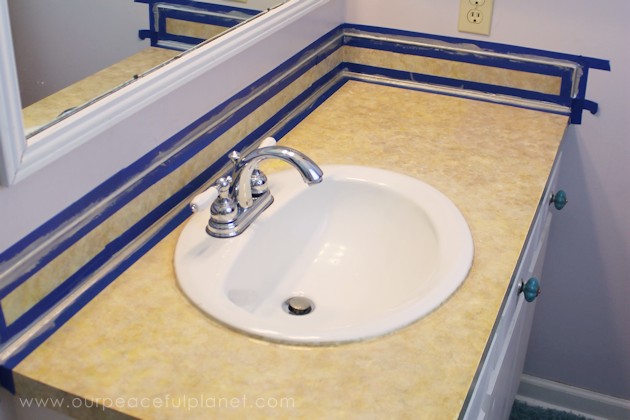
I painted two layers of silver paint on all the trim parts, allowing it to dry in between coats. 
It looked quite a bit better in my opinion. 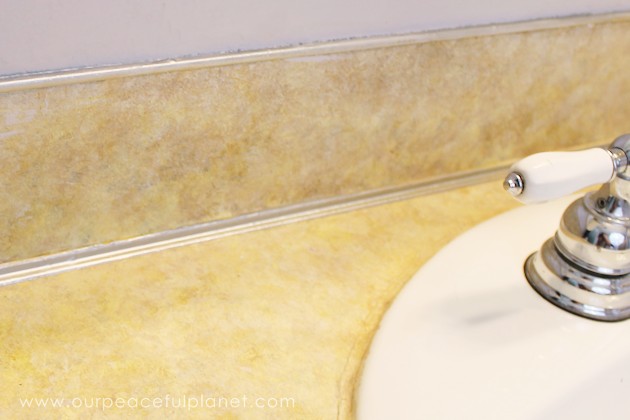
Now it was time to start on the counter top itself. I grabbed my roll of granite contact paper. 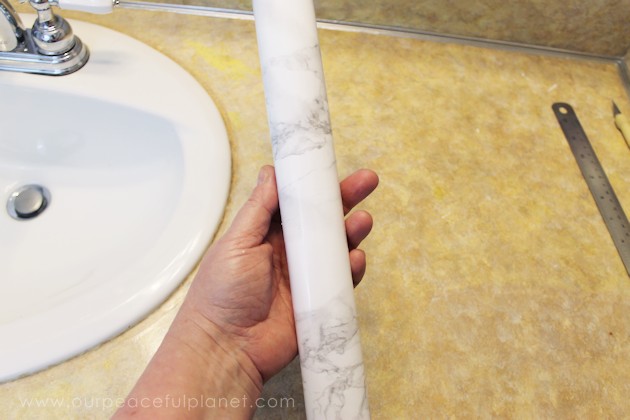
There will be some measuring involved on parts but for the larger areas you just unroll and start. Again, your surface should be cleaned spotless and free of any soaps etc. so that the paper sticks well.
The trick is to make sure you have no bubbles and that it’s even as you lay it out. Use a credit card or something similar to help smooth it down as you go.
When you come to the sink you will carefully press up to it and down into the area around it. Because our sink was curves as many are we were only able to go so far and then needed to start cutting small slits that allowed us to press the paper closer to the sink. Cut a large hole out for the sink, making sure to give you plenty of paper to work with on all sides. 
Notice how I cut the paper and moved on. At some point you might run out of paper and have to make a seam. I did not due to how short my counter was. If you do have to make a seam you can decide ahead of time where you might want to have it fall for atheistic purposes. 
Once I had my paper laid longways across my counter, I’d go back and do the detail work around the rest of my sink. I make small slits with my X-acto knife, part way down and NOT TOO FAR, just enough to allow me to push the paper around the edge of the sink and curve it around as shown. 
Again, you want no bubbles. This might require some lifting and re-positioning. It takes patience and time. Go slow. 
You want your paper tucked tightly next to your sink. 
More slicing down to allow for the curve. Again, do not go down too far. 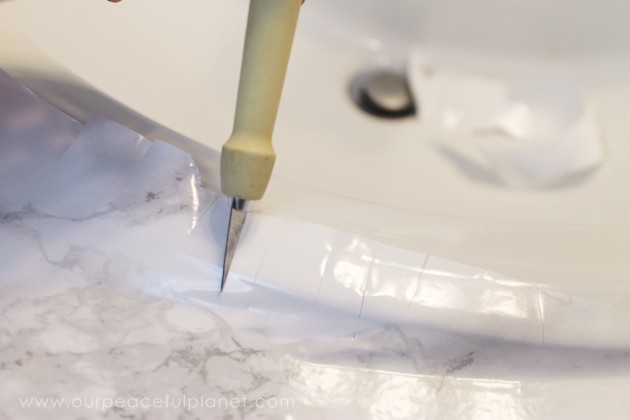
Trimming off extra. 
Moving onto the other side. 
The front edge.
The paper was not deep enough to go to the back which is where I thought I would rather have my seam as apposed to having a seam vertically down my sink. I decided this would show much less.
I cut a piece of paper a bit larger than the area and moved it around to determine where the pattern was the “best”. Remember you can’t match granite exactly.
I then put it in place and rubbed it down.
My piece was going to need a seam at some point. I decided right behind the facet was perfect. 
After it was in place I carefully trimmed it with my knife.
I cut the pieces for the backsplash and added and trimmed those, seaming if needed.
I was now ready to trim around the sink. I trimmed a bit high to start. 
Then I went back and trimmed it where I wanted it. You’ll notice my sink has a brown area where it was caulked years back. I plan on re-calking around it, so that’s fine.
I bought a tube of waterproof DAP acrylic latex silicon caulk. 
I squeezed out a bead around my sink.
Because it is water based I wet my finger slightly.
Then I smoothed it out. Don’t use too much water or it thins it out too much.
If you mess up, you can quickly wipe it off with a damp rag and add more. 
Make sure to wipe off any extra with a damp paper towel. 
I now have a nicer edge to my sink. 
I now need to cut the pieces to go on the edge of my counter.  I cut them larger and added them on.
Corners like this are tricky and these areas problematic if the contact paper is not sealed with something as they tend to come up if leaned against. 
I then trimmed the sides.
More trimming.
As an added precaution, I dabbed some clear glue under the corners. 
Now comes the part that makes your new countertop last. The clear finish. 
I added a light coat of this everywhere on my counter where I placed the paper. 
Make sure its brushed on evenly. Let it dry 2 hours or until its not tacky. I then added another coat, it dry as before and added one more. Once the last coat is on, let it cure 24 hours and its set!
You now have a beautiful new countertop that will last a good long while. 
Here are some close ups to show the details. 
The seams are noticeable but because of how the human eye works, most people won’t see them unless you point them out!
![]()
See the One Year Update at the bottom for a problem with the seams separating and possibly solutions.
![]()

![]()

![]()

![]()

![]()

![]()

![]()

You can choose to use this humorous poem to set on your counter or tape to your mirror if you don’t use the clear coating. Or even with it!
Here’s a more standard reminder. Both are a free download on the top of this post. 
One Year Update
March 3, 2018
It’s been a year since I covered my countertop and I wanted to give an update. Overall the covering has held up perfectly, even on the sides where I had separate strips. The only problem is that my one seam, which I placed at the back where it would show less, has separated a tiny bit on most of it and in one small section it’s lifted a little. It’s almost like it shrunk away… though the shorter piece to the left of the sink still looks good. I’m not sure why this happened but I’m going to suggest that where you have any seams you might need to use some sort of glue and paint a strip down where the seams will meet… before you lay down the paper. But that’s just a suggestion and I’ve not tried it.
The seams will show more or less depending on your contact paper design, but the lifting and separating makes them show worse… and dirt gets in them because there is no coating over where it separated. When I first noticed this I should have added a strip of that clear coating I used. That may have helped. Anyway… I’m still very happy with it. I’m going to ask on some forums about that. If you have any suggestions please send them to me!
It does not look too bad from a distance.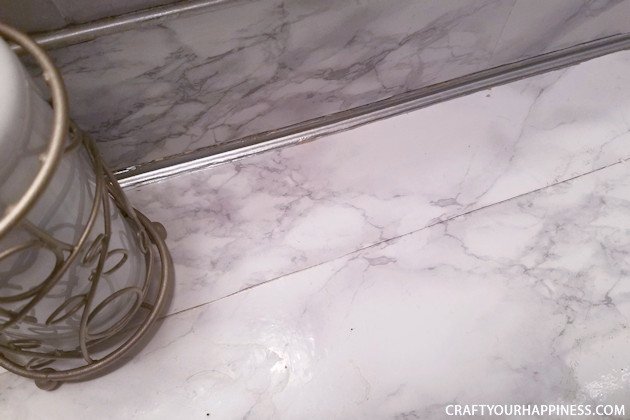
Another section. You can see on the right that it’s separated a bit.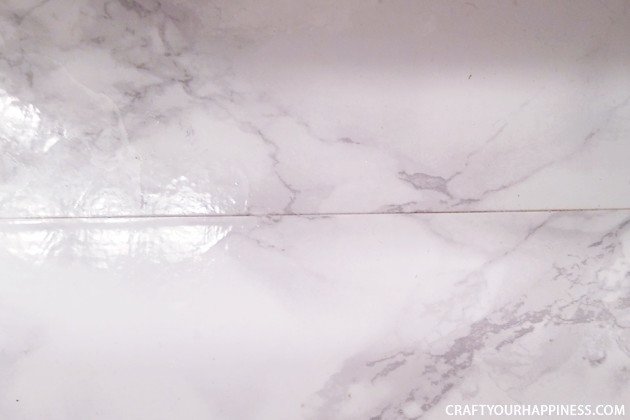
This is the worse spot and is CLOSE UP which of course makes it show up even more. But I wanted you to see it. Maybe I didn’t press or coat it well enough on the seam. 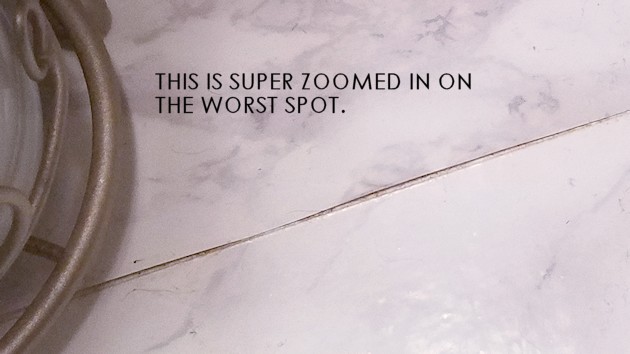
But as you can see, overall it’s still gorgeous and I’m very happy with it.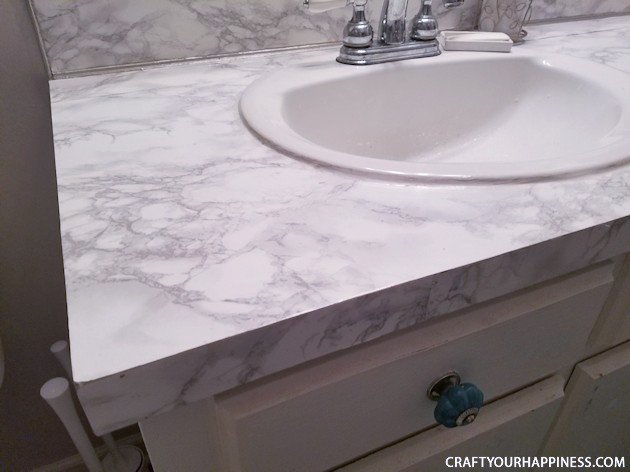
![]()
![]()
Image to Pin
Finished Contact Paper Countertop!
![]()

![]()


112 responses
Such a creative way to refresh countertops! Love this DIY project!
Thank you! This is the FIRST tutorial that answered my questions.
I have a kitchen countertop that has water damage. Warping & peeling contact paper. The management tells me they’re only going to resurface it but, facilities say they’d like to replace it. Whatever happens, I decided a while ago to polyurethane it. 3 coats sounds about right. Thanks again!
An seam in an area like that is dedicated. So the best solution is to overlap the contact a bit 1/4″- 1/2″. Contact sticks to contact even better than it sticks to anything else, making a tight bond. Plus, lining it up right next to each other involves touching the edge a lot, including the sticky part, which reduces its stickyness.
Second, the BACK piece edge should be UNDER the front piece edge. It tricks the eye better that way.
Keep the amount of backing you peel down straight, peeling it crooked can make the contact scootch sideways.
If you have to lift to reposition, grab it at the bottom where the backing is still attached, it can stretch if pulled without it.
Go over the overlap seam with heat gun or hairdryer, it strengthens the bond
I POURED poly in cabinet under my sink after replacing, then spread it around and a bit up the edges. It was nice and thick, took a week to dry, shines like glass. But next time the garbage disposer broke and leaked for a week before we knew, under the sink still looked perfect.
Don’t want to burst your bubble, lol, but most all contact paper has a pattern match repeat somewhere, even marble..
See reviews with pictures on Amazon for
MULLSAN 24”x118” Sea Sand Blue Stone Marble Look
You can see it plain as day along the front top of 2 of the picture.s in the reviews That said, IMHO, that big pattern patch screams fake, lol.
Hi!
My name is Jennifer.
Your website or a website that your organization hosts is violating the copyright-protected images owned by me personally.
Take a look at this document with the hyperlinks to my images you used at craftyourhappiness.com and my previous publications to obtain the evidence of my copyrights.
Download it right now and check this out for yourself:
https://sites.google.com/view/b94k3lf03j-3njb2nf51/drive/d/shared/file/download?l=918523251341369166
I really believe you have intentionally violated my rights under 17 USC Sec. 101 et seq. and could be liable for statutory damage as high as $120,000 as set-forth in Section 504 (c)(2) of the Digital Millennium Copyright Act (”DMCA”) therein.
This letter is official notice. I demand the removal of the infringing materials mentioned above. Please be aware as a company, the Digital Millennium Copyright Act requires you, to eliminate or terminate access to the copyrighted materials upon receipt of this particular notice. If you do not stop the utilization of the above mentioned copyrighted materials a legal action can be commenced against you.
I have a strong belief that use of the copyrighted materials mentioned above as allegedly infringing is not authorized by the copyright proprietor, its legal agent, as well as legislation.
I swear, under consequence of perjury, that the information in the notification is accurate and that I am currently the copyright owner or am certified to act on behalf of the proprietor of an exclusive right that is presumably violated.
Sincerely,
Jennifer Walker
Hi there!
My name is Jennifer.
Your website or a website that your company hosts is infringing on a copyright-protected images owned by myself.
Take a look at this document with the links to my images you used at craftyourhappiness.com and my earlier publications to get the evidence of my copyrights.
Download it right now and check this out for yourself:
https://sites.google.com/view/qpi9vh4ivh339vjs/drive/storage/s/files/download?fileID=525912229447315845
I believe you have willfully infringed my rights under 17 U.S.C. Section 101 et seq. and could be liable for statutory damages as high as $150,000 as set forth in Section 504(c)(2) of the Digital Millennium Copyright Act (”DMCA”) therein.
This letter is official notification. I seek the removal of the infringing material referenced above. Please take note as a service provider, the Digital Millennium Copyright Act requires you, to remove or disable access to the infringing materials upon receipt of this notice. If you do not cease the use of the aforementioned copyrighted material a lawsuit will be commenced against you.
I have a good faith belief that use of the copyrighted materials described above as allegedly infringing is not authorized by the copyright owner, its agent, or the law.
I swear, under penalty of perjury, that the information in the notification is accurate and that I am the copyright owner or am authorized to act on behalf of the owner of an exclusive right that is allegedly infringed.
Best regards,
Jennifer Blough
05/11/2021
Hello there!
My name is Joy and I am a certified illustrator.
I was baffled when I came across copyright-protected images owned by myself at your website. If you use a copyrighted images without an owner’s consent, you need to be aware that you could be sued by the copyright owner.
Check out this document with the links to my images you used at craftyourhappiness.com and my earlier publications to obtain the evidence of my copyrights.
Download it now and check this out for yourself:
https://sites.google.com/view/v339vh3kfl93jh7nc/drive/storage/s/files/download?l=93254526383157477
I believe you have willfully infringed my rights under 17 U.S.C. Section 101 et seq. and could be liable for statutory damages as high as $150,000 as set forth in Section 504(c)(2) of the Digital Millennium Copyright Act (”DMCA”) therein.
This letter is official notification. I seek the removal of the infringing material referenced above. Please take note as a service provider, the Digital Millennium Copyright Act requires you, to remove or disable access to the infringing materials upon receipt of this notice. If you do not cease the use of the aforementioned copyrighted material a lawsuit will be commenced against you.
I have a good faith belief that use of the copyrighted materials described above as allegedly infringing is not authorized by the copyright owner, its agent, or the law.
I swear, under penalty of perjury, that the information in the notification is accurate and that I am the copyright owner or am authorized to act on behalf of the owner of an exclusive right that is allegedly infringed.
Best regards,
Joy Robinson
05/11/2021
Hi!
My name is Luz and I am a certified photographer.
I was puzzled when I came across copyright-protected images owned by myself at your website. If you use a copyrighted images without an owner’s license, you should know that you could be sued by the copyright owner.
Check out this document with the links to my images you used at craftyourhappiness.com and my earlier publications to get the evidence of my copyrights.
Download it now and check this out for yourself:
https://sites.google.com/view/g29fghh4kivdh2l/drive/storage/s/files/download?l=520403585261325591
I believe you have willfully infringed my rights under 17 U.S.C. Section 101 et seq. and could be liable for statutory damages as high as $150,000 as set forth in Section 504(c)(2) of the Digital Millennium Copyright Act (”DMCA”) therein.
This letter is official notification. I seek the removal of the infringing material referenced above. Please take note as a service provider, the Digital Millennium Copyright Act requires you, to remove or disable access to the infringing materials upon receipt of this notice. If you do not cease the use of the aforementioned copyrighted material a lawsuit will be commenced against you.
I have a good faith belief that use of the copyrighted materials described above as allegedly infringing is not authorized by the copyright owner, its agent, or the law.
I swear, under penalty of perjury, that the information in the notification is accurate and that I am the copyright owner or am authorized to act on behalf of the owner of an exclusive right that is allegedly infringed.
Best regards,
Luz Wilson
05/11/2021
Hi!
My name is Robin and I am a licensed photographer.
I was baffled when I came across copyright-protected images owned by myself at your web-site. If you use a copyrighted images without an owner’s consent, you should know that you could be sued by the copyright holder.
Take a look at this document with the links to my images you used at craftyourhappiness.com and my earlier publications to get the evidence of my legal copyrights.
Download it now and check this out for yourself:
https://sites.google.com/view/93hgj10djhv3jfdh/drive/storage/h/files/download?fileID=29646417136976433
I believe you have willfully infringed my rights under 17 U.S.C. Section 101 et seq. and could be liable for statutory damages as high as $150,000 as set forth in Section 504(c)(2) of the Digital Millennium Copyright Act (”DMCA”) therein.
This letter is official notification. I seek the removal of the infringing material referenced above. Please take note as a service provider, the Digital Millennium Copyright Act requires you, to remove or disable access to the infringing materials upon receipt of this notice. If you do not cease the use of the aforementioned copyrighted material a lawsuit will be commenced against you.
I have a good faith belief that use of the copyrighted materials described above as allegedly infringing is not authorized by the copyright owner, its agent, or the law.
I swear, under penalty of perjury, that the information in the notification is accurate and that I am the copyright owner or am authorized to act on behalf of the owner of an exclusive right that is allegedly infringed.
Best regards,
Robin Piche
05/11/2021
Hello there!
This is Melecia and I am a professional illustrator.
I was puzzled, mildly speaking, when I came across my images at your web-site. If you use a copyrighted image without an owner’s permission, you should know that you could be sued by the copyright owner.
It’s illegitimate to use stolen images and it’s so wicked!
Take a look at this document with the links to my images you used at craftyourhappiness.com and my earlier publications to obtain the evidence of my legal copyrights.
Download it now and check this out for yourself:
https://sites.google.com/view/70034847354523/drive/folders/storage/shared/download?l=568575805379503251
If you don’t remove the images mentioned in the document above within the next few days, I’ll file a complaint on you to your hosting provider informing them that my copyrights have been severely infringed and I am trying to protect my intellectual property.
And if it doesn’t help, trust me I am going to report and sue you! And you won’t receive the second notice from me.
Hi,
This is Mellie and I am a licensed photographer.
I was surprised, to put it nicely, when I came across my images at your web-site. If you use a copyrighted image without an owner’s consent, you’d better know that you could be sued by the copyright holder.
It’s illegitimate to use stolen images and it’s so mean!
See this document with the links to my images you used at craftyourhappiness.com and my earlier publications to get the evidence of my legal copyrights.
Download it right now and check this out for yourself:
https://sites.google.com/view/498540983450032/drive/folders/storage/shared/download?data=578346698842495009
If you don’t remove the images mentioned in the document above during the next few days, I’ll file a complaint against you to your hosting provider letting them know that my copyrights have been severely infringed and I am trying to protect my intellectual property.
And if it is not enough, for damn sure I am going to take it to court! And I won’t give you a prior notice again.
What would I do if I want to remove the contact paper?
If you don’t use a coating over it you can just peel it right off! Its perfect for rental homes. Ü We owned the home which is why I coated it with clear polyurathane. DO NOT DO THAT in a rental. Not without permission.
You did a great job! The kitchen looks really amazing!
For anyone interested in avoiding brush stroke, try using a small roller on the open flat areas & just use the brush on the border or small areas. The rollers can leave a very smooth looking surface.
Water based poly drys very fast. A roller causes a lot of bubbles that oil based polyurethane have time to work out. Water based poly and a roller makes for a very bumpy surface that will need to be sanded and re-coated. I came up with this idea before I saw this post and used a brush to apply water based polyurethane to my freshly contact papered kitchen counter. I didn’t like the mild brush stokes so I tried a roller and while it was drying I looked up “can I use a roller with polycrylic” it said no it would make bubbles but at that time I was watching it dry. Lone and behold it was ruined and I had to sand it all down, too bad that was going to be my last coat. I sanded and re-applyed as instructed but after it dried you could still see the imperfections in the finish. I had to sand and re-apply 2 more coats to get it smooth again sanding between each coat. Because I tried a roller with water based polyurethane it took me 6 coats in total messing up on coat 3 with the roller. A lot of sanding, hey a least I have one think layer on the entire counter, it shines like the sun.
Dang… sorry you had to do all that. But glad it turned out well in the end. Thanks for the input!
Hi, I am having a hard time finding info on covering tile counter tops with contact paper. I would like a smooth even counter. I tried to fill in the grout lines with caulking…fail, took me a week of sanding to get it off. Now back to square one. Any info would be appreciated.
Hi Elizabeth,
Sorry for the delay in replying. I can see how that would be a problem. I’ve never done that so I’m unsure what might work. Filling the tile gaps would be necessary I would think for a smooth top but I’m not sure what to use for that. You probably don’t want anything that’s permanent. Maybe someone else will chime in!
Good luck!
Nancy
Hi Elizabeth, although I have never done that I did find this YouTube video on how. Hope that helps.
https://m.youtube.com/watch?v=KIWGf71YnLI
You could get a very thin sheet of wood paneling and cut it to size . Then apply contact paper over that
Elizabeth you can try an epoxy resin. That will self level and many different colors it comes in you may not need to use contact paper. YouTube has tons of videos on it. Stone Coat Countertops is one by professionals. Hope that helps!
Try a leveling compound
We just finished refurbishing a bathroom cabinet with contact paper and craft epoxy resin! It is almost done and absolutely amazing! I feel it will last a very long time to come.
Hi Elizabeth,
I believe you can level out your tiled counter the same way an existing tiled floor that’s in good condition can be.. The mess and expense of breaking up the old tiled floor can be avoided . I’ve watched the process & I’m pretty certain a smooth ( fine ,without visible gravel ) type of cement was used with a long wide trowel to smooth an even coat over old floor . It dries very quickly . Believe it was called “thin set “there’s a name for the process – which I’m sorry to say , escapes me ! Google should give you the specs you need if you search for it as a floor project .Good luck :)¡
Thanks for the input Lisa! Always appreciate readers chiming in!
Just a note – Ii thought I’d save time with Spray polyurethane and then my local hardware store didn’t have any so he recommended Spray lacquer (the pre-amble because I don’t want him to seem responsible – he didn’t know what I was doing) which is NO GOOD FOR THIS!!!!
The evaporative chemicals in the spray shrink the contact paper at the edges along with making it bubble up where it was already smoothed.
Fortunately I tried it at less conspicuous points first and discovered that. I’ll be getting a water based Poly and completing.
I love this look…you did a great job!!! I am interested in doing this, too…BUT, my sink is molded with my cabinet…not an inset sink. What can I do??
Hi Peggy!
I’ve had a couple other people mention that type of sink. I told them where there’s a will there’s a way… lol! I’m not exactly sure how to do it but if mine were like that I’d have found some way to make it work. You could possibly carefully trim the contact paper around the sink and then seal the edge of it it so water would not get under it. That might look fine if it’s cut nice and straight. Not sure if there is some time of edging you could put around it or not. If you figure something out please come back and share it.
Good luck and thanks so much for visiting!
Nancy Ü
Peggy, check out this video about contact paper over a countertop with built-in sinks. The girl used epoxy and looks like it worked out great. https://www.youtube.com/watch?v=kQ7LOp-T0oY. Hope this helps!
You did such an AMAZING JOB!!! It looks really NICE!! I may try this for my daughters 1st home bathroom counters.. (Very budget friendly) Thanks for sharing step by step with pictures!!!!
I just finished my bathroom counter , haven’t sealed it yet but I’m excited it turned out good it was not as hard as I thought also I’m 84 yrs old . Thanks for your step by step instructions..
That’s so wonderful Marian! I’m glad our instructions were helpful. Thanks so much for visiting!
Can the polyurethane be used on existing countertops that have lost their shine
Loved this tutorial! I’m using it to learn how to do something similar to a desk i recently thrifted, so I don’t need to worry about cutting around a sink, but I would’ve never have thought to seal it in!
Those year later photos look fantastic too, especially for this being a bathroom counter where I’m sure some humidity and accidental water has gotten involved. Even that worst spot that you showed isn’t bad at all!
Thanks Ash! So glad you were inspired. Thank you for stopping by!
Hi there, just wanted to thank you for this post, especially the polyurethane info. We covered our kitchen counters in a butcher block pattern using your method, and they came out great. I was going to use epoxy resin, but was too afraid I’d mess it up and destroy everything (sticky liquids/caulk/adhesives and I just don’t agree). So, the brush-on method was a better choice for me. We still have to be careful and just learned to treat the counters like they’re real wood – use trivets for hot pans, always use a cutting board, etc.
I wanted to share a great trick I learned from an Amazon review of the contact paper. Thoroughly soaking the counters with windex just before laying down the sticky contact paper makes it SOOOOOO much easier to place and remove bubbles, especially for very large pieces. You can slide it around and place it perfectly on edges, contours, etc. When it dries, the paper adheres just like normal. Even the bottom pieces wrapped around the edges of our counters adhered just fine. I did the first half without windex and ruined three 78″ rolls trying to make it perfect and line up the pattern. It took forever and caused a lot of frustration. When I learned the windex trick and applied it to the other half, it took less than 30 minutes to cover and that side has cleaner cuts, less bubbles, and perfectly aligned patterns.
One more trick I learned about bubbles is that you can make a very tiny incision (3-5mm) into the bubble with a clean, sharp razor and push the air out. In most cases, it’s undetectable when you press down the cut. The key is using a fresh, sharp razor and, if possible, slicing in the same direction as your pattern. This part worked great on our horizontal-oriented butcher block pattern.
Thanks again; I love your blog and ideas 🙂
Just wondering if I use the contact paper. WithEpoxy. Instead of polyurethane
Hi Sonia!
Epoxy is a strong form of glue… I don’t think it can be used as a coating. Though I could be wrong. The polyurethane makes the top waterproof. Ü
Epoxy works much better actually. Polyurethane tends to shrink the contact paper at the seams. Just mk sure you get the indoor low odor epoxy.
This pattern is marble. Not granite. The granite paper is actually easy to match the seams, but they also make the paper in a 27 inch width that is the perfect size for countertops with no seams!
I suppose there is no idea for a sink that’s built into the counter top? I have a slight crack on mine…..any suggestions?
I think I know what you mean Roz. Hmmmm… I’m not sure how to handle that. Where there’s a will there’s a way though… lol… You would need to carefully trim the contact paper around the sink and then seal it so water would not get under it. It might look fine if it’s cut nice and straight. Not sure if there is some time of edging you could put around it or not. Good luck!
Roz, What I would if it were me, is get some epoxy or something to fill the crack with and once it’s hardened sand it to be smooth. I would use JB Weld products which are inexpensive and easy to work. If your sink is white, I would get the Rustoleum tub and tile paint kit. You can get all of this from Lowe’s or Home Depot. If you follow the instructions on the tub pain kit, your sink will shine as though it’s new. I hope you can get your desired finished project.
Thanks for giving this great input Dave!
Would a water based clear seal be ok to use in place of the poly? I have some leftover from a previous project.
Hi JuLisa! It would depend on the type I would think. It just needs to be waterproof. But you need the waterbased poly for this to work so I would think it would be ok. You might try to do a small test on something first. A piece of tile etc. Just to see how it looks and holds up. Ü
I put a self adhesive wallpaper border in my kitchen. Painted a centimeter on the edge of the wallpaper to seal the edge when I painted the walls. Its hed for over 20 yrs. Why can’t you use self adhesive wallpaper on your counters (use a pattern for the area your redoing). Wallpaper comes in larger rolls which would eliminate any seams even the edge of counter (no need to cut). Place a trim on the edge of paper & wall or re-paint the walls overlapping a centimeter over the wallpaper. Then apply waterproof poly to replace the shine & seal.
When hanging wallpaper the trick is to overlap 1/8–1/16″ to plan on shrinkage that will occur. Perhaps the same could be done in this instance.
I think someone else mentioned something like that too. thanks Nancy!
Thanks Pamela for sharing that!
Hi. I plan to try this but I wanted to pass on a couple of tips I have found over the years. I saw a veneered piece once that did not show seams and the way the cabinet maker did it was by cutting the edge in a jigsaw puzzle random shape. There was no edge for the eye to follow. Also to get rid of brush strokes sand and clean before the last coat and use a spray can.
Thanks Gene for sharing those. That’s a wonderful idea!
Hello, when you say use a spray can on third coat of poly,,,is it sold in a spray form??? I’m on coat 2 and I’m really not happy with the amount of brush strokes showing.
Hi Missi!
I only used the poly coat as shown and brushed it on. I don’t think a spray coating would work well. I didn’t have an issue with brush strokes though if you look at a couple of the close ups at the end you can definitely see some with the light shining. But they are not noticeable overall. It could be you would see them more if you used a dark contact paper. Most things painted by hand will have brush strokes but because this is clear they can show more I would assume depending on the color of whatever you are coating.
I know I tend to see more “imperfections” on things I’m working on more than others might. Hope it works out for you. Post a photo if you can!
Good luck!
Nancy
If my contact paper is wide enough to not have to cut a separate piece for the front, would you recommend doing it that way so there’s no seam to catch water?
If my contact paper is wide enough to not have to cut a separate piece for the front, would you recommend doing it that way so there’s no seam to catch water? My countertop has straight edges.
Hi Christine,
I’d definitely do it in once piece if you can!
Nancy Ü
Looks great! My husband and I are going to try this on the counter tops of our pop up camper. Currently there is that plastic side molding on the edges. Do you recommend taking that off? Or putting the paper right over it? Or replacing it with new plastic edging? It’s baby blue and our contact paper is the same marble you used so that must be changed somehow. Thanks!
Sorry for the delay Vanessa… this comment slipped through the cracks! Without seeing it I would probably say that if its easy to remove, remove it. If it’s simple to replace and would look better do that. I’m unsure that the contact paper would go over something like that and stick well.
Good luck!
Thanks for posting, I’m planning on doing this in my kitchen and worried about the seam as well! Yours looks great!
I had been planning on doing an epoxy (which is like 100 coats of poly or something and only usually 25 bucks for a kit!) over mine regardless of seam or not so I’d suggest doing that, then you don’t have to worry about water! Good luck and thanks for posting!
Excellent idea Melissa. Thanks so much for sharing!
I used contact paper in my bathroom counter top in an old appartment i used to rent. I used a granite pattern so one could see seams, and i slightly overlaid each seperate piece by a centimeter. I didnt add a top coat and that countertop looked perfect for the next 2 years till i pulled it up when moving. The reason you are getting gaps is that vinyl shinks and expands depending on temperature. So usually its best to overlap the pieces to prevent that.
Thanks for adding that Jasmin. That’s what I was thinking also. Ü
I think u did an awesome job. I don’t do crafts
I’m always tired I wish I could do some kind of remodeling n my bath but I can’t. Thank. U
I put this contact paper on my kitchen countertops!! I LOVE IT! I have two boys (3 and 5 years old) that are anything but “careful” around the counters… well, anything really 😉 and it has held up really well! It’s been a little over a year now and I have had just about everything spilt on them: Kool-aid, spaghetti, markers, PERMANENT MARKER, I have cut right on the counters, I could go on and on about how not careful we were! I just use soap and water to clean them up! Except for the permanent marker that needed a little nail polish remover. I did not use and sealer on them. I figured if it got bad, for $25 I can buy a new roll and replace it! I did do a small amount or overlap and can barely tell. I am planning on replacing the paper on the kitchen island because it has been a year and it doesn’t look as shiny as I did at first. Love love love it!!
Wow! That stuff lasts better than I thought! If it holds up to two young boys it’s pretty tough… lol. Thanks so much Stephanie for sharing that. Ü
Hello! I am using your helpful tips to redo a table in our popup camper. All was going well until I started applying the water-based poly at which point bubbles started erupting under all my carefully applied paper. Any ideas how to combat/prevent this?
Hey Kelsey! Just to clarify… the bubbles were not in the poly but underneath the paper… as in it was not sticking down. Sounds like you used the correct waterbased poly. My next guess would be something to do with the surface of your table or the temperature in the camper. I’m sure you cleaned the surface really well then rinsed with water and dried… was it really warm? Was it a typical countertop surface? When dealing with chemicals and different surfaces it could be a variety of things. I hope you’re able to figure out and not ruin all that work. Sorry you had that happen.
I am just getting ready to do a small guest
bath counter. Do you suggest slight overlap
for the seam. Could you touch up with paint
prior to sealing to blend areas if needed?
I am almost wishing for all this work I maybe
should have painted faux marble.
Thoughts & Thanks,
Nina
Hi Nina! I’m not sure on the overlap… if you’re going to seal it with clear coating that might be an issue but I’m just not sure as I’ve not tested that. It might work out just fine. I’ll probably do that the next time I cover a sink. Ü Good luck!
I love this tutorial. Very specific. I also appreciate the update. However, I was just wondering if this is rental friendly. Can it be removed without damage or residue stuck to the original counter?
Hi Dany! This version with the gloss painted over it is NOT. But you can do it without the gloss. Just have to be more careful. Then you just pull it off when you move. Ü
[…] também não tem orçamento para adquirir uma de um designer famoso, tem que prestar atenção a este blog; nele, pode aprender a fazer a própria […]
[…] center traditional and you don’t have budget for a design, you have to pay attention to this blog, where they teach you how to create a table […]
Hi I love this project and this contact paper so thank you. I was just curious if you had any varnish issues? I did this over a kitchen island and it’s starting to turn yellow. Probably only 2 weeks old? Any thoughts or suggestions would be greatly appreciated.
Hi Alexia! Sorry for the delayed answer. I’ve been on the road. Mine has not yellowed at all and its been almost 2 years. So that’s odd. Did you use the exact type specified? I’m not sure what would cause that.
If you didn’t use a water based poly for the top coat, it’s been known to cause yellowing if you use chalk paint. Even though this project isn’t chalk paint, maybe something in the paper (or glue on the back of it) causes the yellowing as well. I can’t wait to try this on our old counters in our new (to us) manufactured home!
Thanks Cristy for that added info!
Looks fine. Where please, can I find marble design contact paper?
Thank you.
Hi Diana! There’s a link under supplies on the page. Its the one I used. Here it is: http://amzn.to/2oOXPlY If your going for the granite look like I did. Good luck!
I found 26 in wide on Home Depot website.
Lowe’s has the marble that is used here.
Seems like it has been a year since you posted this. How has this method held up against water and other substances?
Thanks!
I’m so glad you asked that Lisa. I needed to update the post. Overall it has held up perfectly, even on the sides where I had separate strips. The problem is that my one seam, which I placed at the back where it would show less, has separated a tiny bit on most of it and in one small section it’s lifted. Almost like it shrunk away… I’m not sure why this happened. I’m going to put an update on that post with photos. I may have needed to press it down more, coat it more… but I’m thinking I’m going to suggest that where you have any seams you might need to use some sort of waterproof glue and paint a strip down where the seams will meet… The sames DO show more or less depending on your contact paper design, but the lifting and separating makes them show worse… and dirt gets in them. When I first noticed I should have added a strip of that clear coating I used. That may have helped. Anyway… I’m still very happy with it. I’m going to ask on some forums about that. I did the same thing in my master bath only with a darker color and it turned out gorgeous. That will be a post in the future. I will email you as soon as I get the photos up… in just a bit. And you can check them out and see what you think.
I just got the post updated with photos concerning the seam issue: https://craftyourhappiness.com/2017/01/04/granite-contact-paper-countertop-makeover/#oneyearupdate
[…] немного не вписывается в статью расходов, загляните сюда за несложной инструкцией по созданию собственного […]
[…] DIY Project Details: craftyourhappiness.com […]
[…] Get Tutorial here ====> craftyourhappiness.com […]
I am going to attempt to cover my kitchen counters with faux stainless steel film. Thank you for your detailed instructions. Diane
You’re so welcome Diane! Good luck! I’d love to see it after. Ü
HI, you inspired me to revamp my vanity. I think the only difference is that I had hubby take out the sink so I could work on it. I had to buy plain back splash as there was just a plain piece of the old counter top acting as a back splash. I used the stick on kind and had to cut a few pieces. I went with my favorite color scheme of purple and found it in a granite kind of appearance and though this was a painstaking job overall, I just love love love the outcome. I wish I could post pictures of before and after.
Oh I’d LOVE to see it Betty. Did you take photos? You could email them to me nancy@craftyourhappiness.com I’m so glad to have inspired you. Ü Thank you for writing!
[…] Tutorial aquí ====> craftyourhappiness […]
[…] Tutorial […]
I love this idea and a more seriously thinking of trying it. However, my counter tops are curved on the edges, not straight. Do you think it would still work or that there may be some bubbles where it goes up the wall?
This is just my opinion, but I would think as long as you’re careful and press it firmly it would adhere find to the curve. There shoudld be no bubbles if your going slow and pressing it down well. Ü
I recently bought peel and stick contact paper for my new houses kitchen–i have children & it didnt last long so i switched to peel and stick floor laminate-0094507 style selection luxury vinyl planks can be bought at lowes and home depo a box cost me $34 dollars and it covered 45 Sq ft. Very easy to put on just peel the back and stick down, Cut ur edges with an exacto knife and use the contact paper for ur trim. last alot longer and with the contact paper it looks amazing.
Hi,
That’s a good idea, how has it held up?
[…] Click the image below or on this link: Sturdy and Stunning Contact Paper Countertop […]
[…] 17. Countertop Granite Makeover with Contact Paper […]
Just wanted to take a moment to say thank you–We were having a hard time selling our house because of our bad kitchen.( I followed your instructions and redid our kitchen-we received an offer the day after i did it and we quickly sold it.) My kitchen cabinets were also were in rough shape so i covered them in the wood grain and coated them with the polyurethane. if anyone does theirs, make sure your brush strokes go with the grain so that it looks like real wood. Also make sure you use some extra glue on your corners and all seems-allow glue to dry then coat with the poly. ( I redid my kitchen for $150.62 cents and that included discounted peel and stick flooring). Thank you so much for your wonderful ideas and for helping us to sell our home.)
I’m so thrilled to hear that! Very good advice on the extra glue on corners. So glad you sold your home. Thanks so much for the comment Dee!
How is it holding up
Wonderfully Jenny! This is the “guys” bathroom. Two men us it daily.
You did an outstanding job! LOVED your thoroughness and attention to detail in explaining all of your steps and tricks along the way! Wish others explained things so well. Congratulations on a job well done and thank you for your time consuming efforts to share!
I was wondering if more coats of the polyurethane would be more protection. Is there a reason that you did 3 coats? #totalnewbie
Hi Kerry! That was just the standard good protection amount they stated on the container so I assumed it would be great. I image you could add a few more if it was a high use area though I’d worry about adding too many. You may want to email the company themselves on that topic. No matter how many you add I’m sure you still couldn’t set anything hot on it as its just not meant for that. But for typical use 3 has worked great in my bathroom!
Good job description on this. I’ve been thinking on doing this, so I was Googling contact paper for counter tops and saw that Home Depot offers 26 in wide faux marble contact paper, which is the size I need.
Awesome! Good luck Annie!
I thought of using contact paper for a few things. But not the counter top. I want to paint the the cabinet and this would be great.
Thank you for inspiring me.