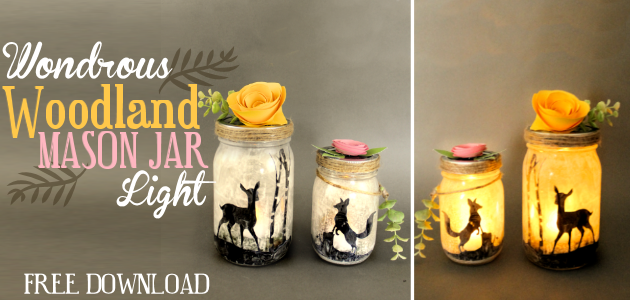

![]() Not your typical mason jar light, these wondrous woodland silhouettes will bring a whimsical touch of nature into your home. Get your free download of our own patterns below. (In both pdf and Silhouette Cutter format!) These will work on pint size or quart jars. The lovely paper rose that you see can be made using our simple tutorial 5 Minute Beautiful Paper Flowers. We also found a better way to tint those jars! So make sure you view How to Paint Mason Jars Easily with Less Mess.
Not your typical mason jar light, these wondrous woodland silhouettes will bring a whimsical touch of nature into your home. Get your free download of our own patterns below. (In both pdf and Silhouette Cutter format!) These will work on pint size or quart jars. The lovely paper rose that you see can be made using our simple tutorial 5 Minute Beautiful Paper Flowers. We also found a better way to tint those jars! So make sure you view How to Paint Mason Jars Easily with Less Mess.
 Supplies
- 1 quart and 1 pint mason jar
- X-acto Knife
- Good white paper (at least 97lbs) to print the graphics on
- Cutting mat (optional but you need a good hard surface to cut on)
- Twine
- Battery Operated Tea Light
- Printable patterns below
- Spray adhesive
- Moss
IMPORTANT
Because the image provided is so detailed you need to make sure the following conditions are met to get a nice clean cut:
1. Use a precision craft knife. We used a #1 (barrel size) with a #11 blade which is the thinnest for detail work.
2. Use quality inkjet paper that is at least 97 lbs in weight. Thinner paper will tear easily:
3. Cut on a very good cutting mat or any hard surface that will not be harmed by the knife.
Download Pattern
pdf

Instructions
Gather the few supplies you’ll need.

Painting the jars. What we did and suggest NOT doing. For the jars shown we placed some Mod Podge into a bowl and added a squirt or two of white paint. We then brushed it onto the sides of the inside of the jar. The result was not nearly as nice as we wanted. Though it looks great lit up in the dark, in the light it looks messy. So we tested another method that we suggest using instead.

A better method to paint your jars.
Because we were unhappy with our original jar painting, we did some testing. Then we created a post on how to paint mason jars which you can check out before moving on to the rest of your project.

You can cut out the graphics in minutes using an X-acto knife. 
They’re now ready to place in your jars.
In order to hold the images inside the jar used a light spritz of spray adhesive. 
Carefully put the image inside the jar, pressing it into place. 
We placed a small amount of moss in the bottom of the jar and set our battery operated tea light on top of it.

Batteries for these lights are very cheap. The ones I use and linked to under supplies are on a timer. 
For the top of the lid we used a 5 Minute Paper Flower.
![]()

![]()

![]() Glue your twine around the edge of the lid.
Glue your twine around the edge of the lid. 
We added an extra little flourish tied on with some twine. 
You can decorate your own Mason jar lights however you wish!
![]()
