
A pillow box is a nifty little invention that’s perfect for putting a small gift in. They are magically self closing and most are made from cardstock. But we’re going to show you how to make one from a plastic soda bottle! It’s easy and fun. Plus pillow boxes aren’t the only thing you can make from a soda bottle. (Not to brag or anything, but we kinda consider ourselves soda bottle gurus over here.) First, you gotta check out these other awesome Christmas Gift Wrapping Ideas Using Soda Bottles (though you can use them any time of year of course.) Next, well… where to start… I’d have to say one of our more popular soda bottle posts is our Geometric & Confetti Plastic Bag Holder & Dispenser. It’s an upcycle that not only looks great but is useful!
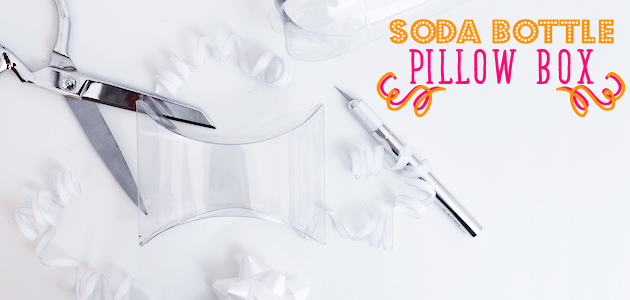
Pillow Box Supplies
- Clear Straight Sided Soda Bottle (works with most sizes, 32 oz being a good average)
- X-acto knife
- Scissors
- Dry erase marker
- Small bowl, cup or plate to match the end of your bottle
- Bone folder or butter knife for pressing sides of bottle
When your finished, use the pillow box for a Valentines Gift idea!
![]()
Instructions

I use a dry erase marker for making all my cutting lines because it wipes right off afterwards. 
If you’re lucky there may be a line already near the bottom of your bottle. There was on this one so I used it as a cutting line. If not, you’ll have to measure up to cut off the base just where it stops curving in. 
After I cut the bottom off I then measured up and marked the bottle using my dry erase marker where I would cut it on the top. Go as high as you can before it starts to curve.
Cut along where you marked. 
Wipe off your marks and you should now have a cylinder. 
Carefully flatten the cylinder and crease it on two sides. Press is with your hands and fingers to start but you will then need to use something to get a crisp crease on each side. 
I use a bone folder which is made for the purpose of creasing paper and card stock. Its actually made out of bone and very strong. You can use pretty much anything, however, that will give you a good crease. The handle of a butter knife for example should work well. Just make sure to get a good crisp crease all the way to the ends. 
You will now cut a curve around each end. To do this you need to find a cup, bowl or plate that fits your bottle end as shown. You want a nice gentle curve as shown, with very little being taken off. You want the bowl to barely touch the top of the end.

Mark it with your dry erase marker as shown. 
Cut off the end where you marked and do the same on the other side.
This is the part is a little tricky. Take your bowl and face it the OTHER way on each end. 
Make sure to score it with the knife all the way to the corners. As the scoring will not go through to the back side, you will need to flip the container over and do the same thing to the back side, then repeat the same thing on the other end.
![]()


Carefully bend down on the crease you made with the knife and fold it inward. 
Pinch the crease some if needed to help it bend inward.
Once pressed in, it should stay. You can pop it out to do the other side. 
To close your container you close one flap in, then the other. Do this on both sides. 
Fill them with whatever you like and wrap a ribbon around them!


We also used this container for our Pretzel Arrows Valentines Gift Idea.
