
![]()

These are so cozy and feel so good against your skin and it only takes about 20 minutes to whip up a pair. You can adorn them however you wish with buttons, ribbons, appliques etc. Fleece comes in a huge variety of colors and patterns so you could literally have a wardrobe of arm warmers. I use them in the early winter mornings as I keep my house a bit cool. I almost don’t want to take them off when it warms up!
I sewed the sides on my sewing machine but I ended up sewing the hems by hand as I liked the look much better. Because you are working with fleece you don’t actually need to hem them as you can see in the example of the pink arm warmer below. There is a free download of the pattern that also includes the instructions. ![]()
Materials Needed
- Download the pattern provided below. This is for a normal size adult female arm. You can adjust it if needed.
- 1/2 yard stretchy type fleece.
- Buttons or anything else you’d like to adorn them with.
- Scissors / Thread / Sewing Needle / Sewing Machine
![]()
PATTERN DOWNLOAD

Instructions
 Cut out your pattern. Tape the bottom part onto the top pattern. (You can make shorter ones if you prefer.)
Cut out 2 sets from your material. The pattern is made for a 1/3″ to 1/2″ seam allowance. You can adjust if needed.
NOTE: As fleece is so cheap I actually made a test arm warmer to make sure they would fit OK and see if I needed to adjust the pattern.
Sew the sides together and the area between the thumb and hand opening. Trim the inside seams to about 1/4″ to reduce bulk.
NOTE: When sewing the thumb opening you may want to make that one about 1/3″ and taper out as you sew down the sides. It’s a fairly close fit. You can always take in a little more if needed.
After sewing the sides and small area between thumb and hand opening turn the warmers inside out.
HEMMING: These can be hemmed by machine, by hand or left raw. I decided to hem mine by hand on the thumb, hand and arm opening. I had tested doing one with the sewing machine and didn’t care for the look near as well as the hand hem. You also have the option to not do a hem as fleece does not ravel. Just cut off about 1/2″ from all openings if you decide to keep the raw edge.
![]()
Visual Steps
NOTE: I’m not a seamstress by any stretch of the imagination. So you may know easier or more professional ways to do some of these things. Please adapt to your own skill level!
Tape pattern piece #2 onto the bottom of pattern piece #1. 
![]()
Layout your pattern on folded material and cut 2 sets out. 
![]()
Sew sides of arm warmers and also the little V shape area between the thumb and arm opening.

![]()
Trim seams to about 1/4″ to reduce bulk.

![]()
After sewing edges.

![]()
You can hem the three openings in various ways or leave them raw as fleece does not ravel. I chose to hand hem mine as I preferred that look the best. Choose whatever method you like. (The thumb piece will be tricky to hem on a machine due to how small it is. Hemming it by hand was much easier.)

![]()
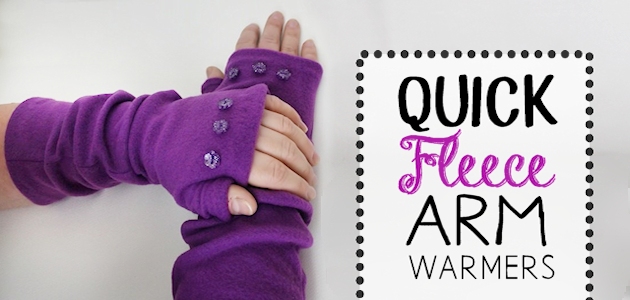
You can decorate these in a variety of fun ways. I left my black ones plain and added three buttons to the purple set. But use your imagination! 
![]()
Completed arm warmers.

![]()

![]()

![]()

![]()
This shows one that I left the edges raw. Just make sure you cut them really straight for this method.

![]()
![]()
This Article Featured At
Delightful Made
Titi Crafty