
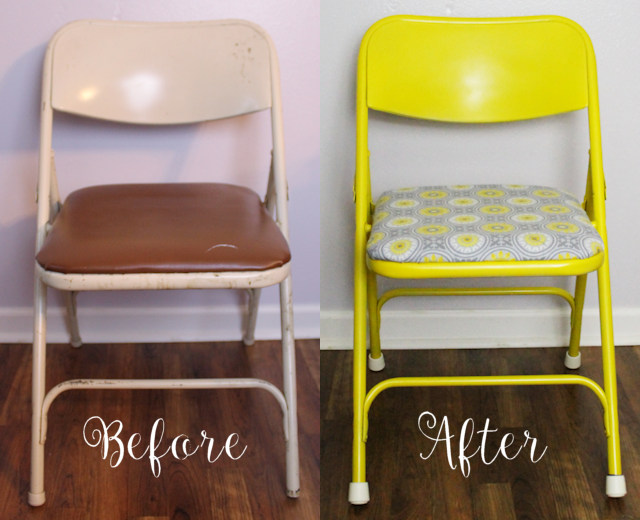
![]() Do you have items in your home that fall under the category of “functional but ugly”? My craft room chair was one such item. I liked it because my craft room is small and this fit in well and it had a soft seat. When I made over my craft room this of course either had to go or get a makeover. I chose the latter! I did a super quick version… no sanding, no priming. I’ll show you my steps on how to paint a folding chair and even recover it if needed!.
Do you have items in your home that fall under the category of “functional but ugly”? My craft room chair was one such item. I liked it because my craft room is small and this fit in well and it had a soft seat. When I made over my craft room this of course either had to go or get a makeover. I chose the latter! I did a super quick version… no sanding, no priming. I’ll show you my steps on how to paint a folding chair and even recover it if needed!. ![]()
![]()
![]()
Supplies Used
- Folding chair (can have padding on the seat or back)
- Spray paint of choice. Rustoleum is an excellent brand for metal. (1 can gave me 3 light coats)
- Material to match. Measure how much you will need. My chair seat took 1/2 yard.
- Leg caps if needed
- Staple gun (for attaching material to seat)
Preparation to Paint a Folding Chair
Remove the seat and/or back if it's padded. Remove the leg caps. Clean your chair with soap and water well, using a toothbrush to get into the nooks and crannies. Spray paint two to three thin coats, letting each one dry very well before adding the next. This might require doing it in sections as you have to turn the chair upside down to reach all the areas. You are welcome to sand any rust areas and then use primer paint first if desired, though I chose to not do that.

Covering Padded Areas
Pick some nice material for the padded areas. Heavier fabric will last longer. You may need to purchase foam and cut to fit depending on whether the padding is in good shape. I was able to cover right over the vinyl on mine. Lay your seat face down on the material and while wrapping it around staple the edges snugly. I kept mine unfinished underneath as I didn't care what that part looked like.

Leg Caps
The leg caps on my chair were in pretty bad shape and one was missing. So I decided to replace them. The one's I found were a tiny bit large and would not stay on the legs. To remedy that I took a thin strip of duct tape and wrapped it around the bottom of each leg a couple of times. The caps then fit on snugly.


28 responses
[…] A Chair With Flair : Paint a Folding Chair […]
[…] Repaint and reupholster an OG folding chair for a whimsical new […]
[…] Makeovers don’t have to be dramatic to be beautiful. I was in need of an extra chair at a second location on my office wall desk. As the area was small I didn’t want anything too big and bulky. I looked through what I had in storage and found this old brown folding chair. It was missing the bottom leg stoppers but other than being ugly was in decent shape. With a little paint and a touch of vinyl it matched my office perfectly. (For a similar idea check out our Chair With Flair!) […]
Thank you, thank you, thank you for sharing this idea at my link party. I really appreciate your participation!
You bet!
Your chair looks great! I wish I had seen this a little bit earlier–I just bought new chairs 🙂
Maybe i’ll have to update those anyways..just cuz 😉
lol! Thanks so much Brittany for stopping by!
What a difference. Love it!
Thanks Kathleen!
This is super cute! I see folding chairs in thrift stores all the time, but always pass the by as a diy project! Thanks for the inspiration. Will pin for later!
You’re so welcome Judith! Always glad to inspire. Thanks so much for stopping by and commenting!
This makeover is amazing!! Love how it turned out!
Thank you Kari! I was pretty pleased myself. Ü I’d never done one before.
What a great idea! We picked up a bunch of folding chairs at Walmart last year and they are in desperate need of a makeover. I LOVE the yellow, such an awesome pop of colour!
Thanks Emily!
This is so cute and seems like a pretty doable project! Thanks for sharing!
Thanks Falon!
I have 6 of those folding chairs. Two are 50 years old and the other four are a bit newer. They are scraped and battered and needing a lot of TLC. Now, thanks to your instructions, I know that they can be made beautiful. They won’t need to live in the garage anymore! Thanks!
You’re welcome Sandy! Thank you for commenting and visiting us!
Who knew a folding chair could look so cute! We have a few we should do this with. Thanks for sharing!
You’re so welcome! Thanks for stopping by!
Oh I think I need a little yellow in my life somehow – I love how cheerful this is.
I am sitting on a “functional but ugly” item right now, time to do something about that I think.
lol! Yeah I’m glad I picked yellow. It does brighten the room up! Thanks so much Julie for stopping by and commenting!
This project is on my to-do list for this summer! I love the color and the fabric you chose. Looks great!
Thanks Pamela. I was pretty happy with how it turned out myself!
I’m dropping by from Feathered Nest Friday. Boy howdy! I need this idea really bad! I’ve got a whole flock of chairs that need some flair! Now I know what I’m going to do this weekend!
I have a link party that I’m trying to grow. I invite you to share this idea (and a couple of others) at my Grandma Ideas Sharing Time link party at http://grandmaideas.com. My readers would LOVE this idea, too! The party goes from Wednesday through Friday at midnight Mountain Daylight Time so it will end soon. I hope to see you there.
I also have a giveaway for 3 free DVDs (Woman in Gold, Big Eyes, and The King’s Speech) plus a $25 gift card. I invite you to enter that giveaway, too. It ends at midnight Mountain Daylight Time on July 14.
All the best,
Nina
Love what you have done with the chair and your instructions. I like upcycling old chairs myself. Thanks
Thank you so much Claire. Ü It was fun to do for sure.