
This rustic little tree is made with six plastic hangers, some twinkle lights and burlap. It’s a great little, easy upcycle project and would make a perfect tree for a small family or an extra tree for another room in the home. Set it in a window and light it up for a beautiful eye catcher as people drive by. Make some of our rustic Twig & Twine Wooden Reindeer to go with it or adorn it with Christmas Spiders. Now that would be unique!
 Take some of the pressure of the holiday season by ordering your Christmas cards online at Basic Invite! They have beautiful selections with features other companies don’t, such as a printed sample before order. Get 15% off using this code: 15FF51.
Burlap Christmas Tree Supplies
NOTE ON BURLAP: Use tight weave burlap. We bought a roll of 12″ at Walmart that had silver threads running through it. It was 10′ long. We cut it into two 6″ strips and it just did one tree. However, we did not overlap ours very much going up. In retrospect I would have put them a little closer, which means I would have needed a bit more. You can also use thinner strips but you will also have to use more burlap to cover the tree that way.
- 6 Plastic White Hangers
- Glue Gun
- Burlap, tight weave. For 6″ strips you will need at least 20′. For 5″ strips you will need more etc.
- White Chenille Stems or Twistie ties
- 50-60 String LED Lights
- 1″ Jingle Bells
- Star Pattern Below
3D Star Pattern Download

Instructions
You are going to take two hangers and lay them as shown on top of each other. I’m using a blue and white one so you can see how they lay out easier.

Cut some chenille stems for tying your hangers together. 
Tie them in the spots shown. 
Two on each side and one on the top.
Make three sets like this. These form the three sides of your tree.
You will not attach the side together using more chenille stems plus the ones already attached.
The side ones can be twisted together if you left them long enough. 
If the side pieces are too small you can just add more chenille stems.
You will now attach the top parts together using new chenille stems as shown.
Attach the three together, twisting the chenille stems tightly. 
This is how it will stand up once it’s secured. 
Taking a 3rd piece of chenille stem, tie the entire thing together. 
Tie it together at the bottom also. 
Here is your tree base!
Get your burlap ready. We used a 12″ by 10′ piece.
We folded it in half and cut it so each piece is 6″ wide. 
Cut a few more pieces of chenille stems for attaching your lights to your frame. 
Weave your lights in and out around your frame. You would also put them into the center but I was concerned they would not be bright enough to show through. 
Attach your lights where needed to keep them from slipping. You can also hot glue your chenille stems in place to help. 
Keep weaving your lights around, in and out and down. 
As I tried to push a big wad of the lights through my frame it broke one of my hangers. I tied it back together with a chenille stem and held it with hot glue. 
Keep in mind all of the lights that stick out will be pushed to the inside as you cover your frame with burlap. 
Make the frame more sturdy by gluing the sides together in places as shown.
More gluing. 
I ironed my 6″ piece in half for a nice sharp edge then cut up in 1″ slits about 1″ from the top. ONLY CUT ONE LAYER.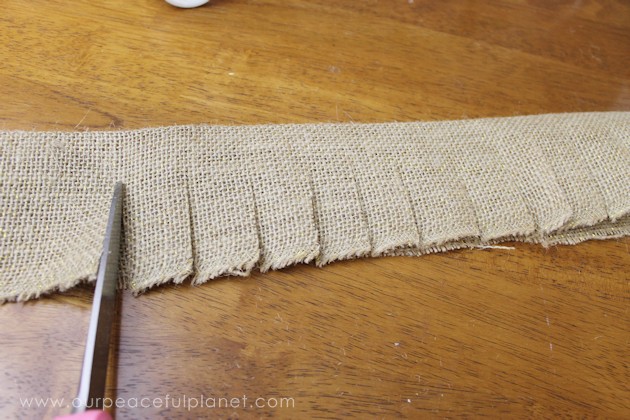
This shows how I only cut one layer. This assures that the frame does not show through. 
Begin gluing your burlap around your frame. You will cut each side piece separate and wrap it around for gluing.
Make sure each side is glued well.
Overlap each piece as you go around so none of the frame shows through.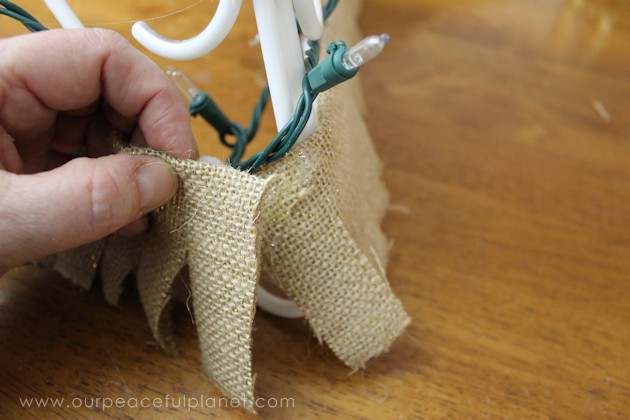
Push the lights into the back if they stick out too much.
After you have done one row move onto the next, overlapping. 
Keep going around as before, overlapping the sides. As you can see, I didn’t cut enough on one row and the frame showed through. See the next photo for the fix.
I cut a single strip to cover the open spot. 
As you get closer to the top you will need smaller strips. Near the very top one strip will cover three sides and possibly all four. 
Usually, one last piece will wrap around the top completely.
You will have to curve it in a way that it makes the point. Make sure you aim the back of it towards the actual back of your tree.
You can now glue on your bells. Do this while the tree is on its side as the glue will run. Also, metal is a heat conductor so use something to help hold the bells as they will be hot from the hot glue as you hold them!
Paper Star Instructions

Attach a chenille stem to your star.
Insert it down into your tree top.