
![]()
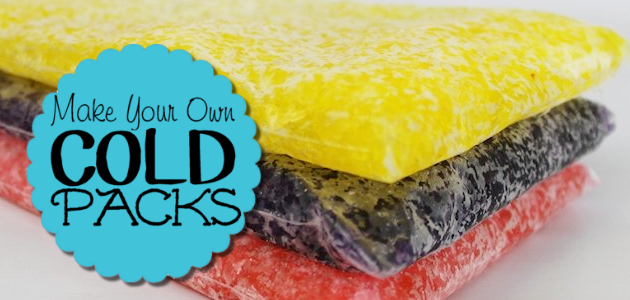
These beautiful and pliable cold packs are amazing. They are so easy and cheap to make you’ll almost look forward to your next sprained muscle so you can use one! (Just kidding.) You can also use them to help keep food cold in a lunch bag or just to help you cool off on a hot day. They require two basic ingredients: water and rubbing alcohol in a Ziploc bag. Takes 5 minutes. (Then at least 4 hours of freezer time.) 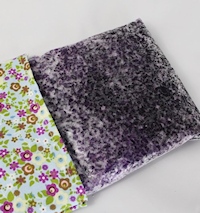 If you want to make them uber cool add in some food coloring and Water Crystals. They make it even more pliable and look wonderful. They make them last much longer too.
You always want to wrap these in something even if its a washcloth so that the cold pack doesn’t go directly on your skin. I also show how to make a quick pouch to put them in. Sewing a pouch takes about 10 minutes. I’ll give you detailed instructions. Remember, you can make these with just water and alcohol in a pinch and they work great!
![]()
Supplies for Cold Packs
- Water (Plain water works but distilled water is the purest and will not discolor over time.)
- Rubbing Alcohol (Keeps it from freezing solid.)
- Ziploc Type Bags. Freezer type will of course last the longest.
- Food Coloring OPTIONAL
- Water Crystals OPTIONAL
- Iron and foil for sealing bag closed. OPTIONAL
- Material for Pouch OPTIONAL

About Water Crystals

 These are totally optional but they sure make these things ultra awesome and extra pliable. Water Crystals can be found in the gardening section of most stores like Lowe's or Home Depot. Miracle Gro is one brand. Walmart can also carry them during planting season. They are used to retain moisture in the soil as they can absorb many times their weight. The crystals technical name is polycrystalline and is used in other things like diapers and feminine pads. That's how those diapers can hold SO much liquid!
Cold Packs Recipe
The ratio is two parts water to 1 part alcohol. For my size of baggie I used 1 Cup Water and 1/2 Cup Rubbing Alcohol. For every 1 cup of liquid use about 3 tsps of Water Crystals. (optional). Add as much food coloring as you like, again optional. Below is printable version of the recipe.1 Quart Heavy Baggie, Zipper Type. (Preferably freezer bags because they are heavier. (Any size works just adjust liquid as needed.) 1 Cup Water (preferably distilled) 1/2 Cup Rubbing Alcohol 3 tsp Water Crystals (optional) Food coloring as desired (optional)
Visual Steps
These take about as long to make as it takes to pour liquid in a baggie but there are a few small hints that will help. I'll clearly state the optional steps.
Pour your water and rubbing alcohol in your baggie. Add food coloring if desired.

![]()
If you choose to add the Water Crystals which are optional add them now. These make it extra pliable. 3 tsp per 1 cup water.

This is what it looks like immediately after adding everything including the crystals. Let this sit for 15 minutes while the crystals absorb the liquid. You can squeeze it a bit now and then to mix.

![]()

This is how the cold packs look after being in the freezer overnight. You can squeeze it as its still very pliable but if you're sealing it with an iron don't squeeze it much yet. At this point I lay the bag on the table and press out all the extra air that I can and zip lock the zipper part. I make sure to keep the contents away from the end because I also like to do the next step of added sealing.

![]()
This step is optional but I wanted an extra seal on mine in case I squeezed it too hard and end popped open. If you're careful its not really necessary. Take a piece of foil and cover the end ABOVE the zipper part. Run an iron on medium heat over the end until it melts together a little. You may want to test this on an empty bag to get a feel for how long it takes.


You can now squeeze the contents evenly throughout the bag. If you did not choose to seal it with an iron you can do it right after taking it out of the freezer.

This smaller one shows what water and alcohol only looks like. (With food coloring.) I used 6 x 9 heavy bags I had. This one below is a 4 x 6 heavy bag. 
![]()
You do not need Water Crystals. They do make it a nicer, more even consistency and it lasts much longer, but its still very pliable without. Just a more slushy feel.

Sewing A Quick Pouch
You always want to wrap your cold pack in a cloth, dishtowel or washcloth before applying to the skin. You can also make a pouch in about 10 minutes.
Get a piece of fabric folded over that is larger than your cold pack.

Lay your baggie on top of it and cut it about 1/2 to 3/4 an inch wider also leaving that much on the top.

Hem the top of your pouch.

With the fabric inside out sew the sides of your pouch.

Completed pouch in 10 minutes!

Place your cold pack in the pouch for use.


You can make these any color you like or make a color for each member of the family!


