
![]()
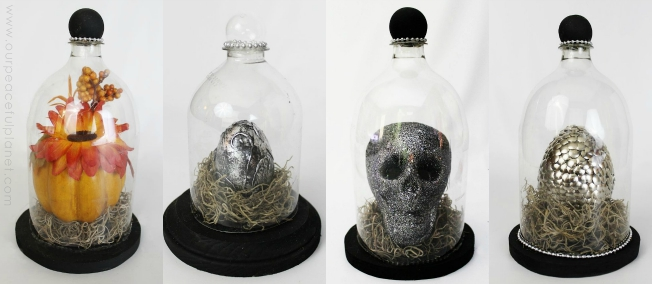
So I had some dragon eggs I needed to display. (No, I’m not kidding.) I found the perfect solution! Cloches made from plastic soda bottles. (Also known as Bell Jars.) This is one of the coolest ways to recycle and upcycle something! They are very simple to create, the most difficult item to find being the top round handle. I only found one source that worked which was an Etsy shop. They were a little pricey so I also show a version made with regular wood balls found at any craft store. If you find something cheaper and easier that is clear and round please share here in the comment section.
The bases are wood rounds also found at a craft store. They didn’t have the exact size I needed for the larger bottle so I asked my dad to cut me some wood rounds. Very easy if you have the tools to do so. I’ve seen the bases made from two circles cut from black foam sheets and glued together. Those looked sloppy to me so I opted for the wood.
I also did not have the best saw to cut the top off screw part off the bottle so it was a little rough looking. I put some trim around to help cover it. Using a miter box or a better saw would help. You can’t cut that part with an X-Acto knife. Its way too thick. Below you’ll find a list of all the tools and options. I’m the queen of making do so if you don’t have a specific item find something else that works!
![]()
General Supplies Needed for Cloches

- Plastic soda bottles with SMOOTH sides. (IMPORTANT. SEE MY PHOTOS) Either the approx 33oz size or the 2 liter size depending on what you want to display. Both are shown.
- X-Acto Knife of something similar.
- Ruler
- Hot Glue Gun
- Sharpie Marker for marking bottles where you will cut.
- Wood bases about 1/4" larger than cut bottles. See details for each bottle size below.
- Paint for base. I used black. Also for wood ball if your using that.
- Round top handles. Wood or glass. See details for each bottle size below.
- Fine saw for cutting top threaded area. We used a hack saw but it was a bit rough. A dremel melts the bottle too much.
- Spanish Moss for around display item. This depends on what you display.
- Lid from soda bottles (This works perfectly to hold things like eggs upright. Not needed for other items.
- Goo Gone (or similar to clean label remainder off of bottles)
Details For Each Size Bottle
SMALLER BOTTLE 33oz Bottles Wood Base: Aprox 3.5" (Good idea to measure. You want the base just a tiny bit larger than the bottle.) Fits a regular size egg. (if your doing dragon eggs anyway) LARGER BOTTLE 2 Liter Bottle Wood Base: Aprox. 5.5" (Good idea to measure. You want the base just a tiny bit larger than the bottle.) Fits a 3" tall foam egg. (Again for dragon eggs. Measure for your own items.) BALLS FOR TOPS If you can find glass balls you can use them. Wood balls also work. Glass Ball: I used 1.1 (28mm) glass balls I found here. I would have liked larger but this was the largest they had.) Wood Ball: 1 1/4" size. 1 1/2" would possibly work also. TOP BALL SUGGESTION: I had a reader suggest using tiny Christmas tree balls for the top of the display. What a great idea! You may be able to find those clear too possibly. They just need to be the ones for really small table trees.Assembly Instructions
- Remove the label form your plastic bottle. Use Goo Gone to remove residue being careful not to scratch the surface.
- Measure whatever item your going to put in your clochea allowing for an inch or two above it. Measure and lightly mark the bottle with a Sharpie marker.
- Using an X-Acto knife cut the bottom off the bottle carefully and as straight as possible.
- Using an appropriate fine saw cut off the threads on the top of the bottle ABOVE the lip part that sticks out at the base of the threads.
- Paint the wood base. Paint the round wood ball of your using that. Glass balls are left as is of course.
- Put a fine line of hot glue on the top of the bottle for holding the ball in place.
- If your doing an egg glue the lid from the bottle in the center with hot glue. lightly put a couple dabs of hot glue on the edges to hold the egg in place.
- Add moss around the base of the egg.
- Cover with the bottle. I place a dab of glue at the base on the back to hold the bottle in place.

Smoothing Edges with an Iron (extra info)
I learned to do this after I had done this post which is why it's not shown in the photos. Rounding the cut edges makes for a much nicer finish. Here is how you do it!You can seal the edges with an iron to give them a nice rounded finish. It's optional of course but pretty cool and doesn't hurt your iron one bit!
1. Set your iron on high.
2. Press the cut edge of your bottle firmly on the base of the iron for 5 to 10 seconds until it starts to curve.
![]()
Photo Instruction
Measure and mark with a sharpie depending on the size of what you will put in it.

![]() Cut it as straight as possible right above the marks.
Cut it as straight as possible right above the marks.


![]()
Cut the top off right ABOVE the ring that sticks out. This is HARD plastic and requires a fine blade saw.

![]()

![]() Wood circles purchased at craft store.
Wood circles purchased at craft store.

You can also cut plain wood circles 1/4" larger than the base of the cut bottle. My dad made me these.

Paint your base.

For top round handle use clear glass balls or wood balls. I could only find the glass ones here.

![]() For the wood ball paint it.
For the wood ball paint it.
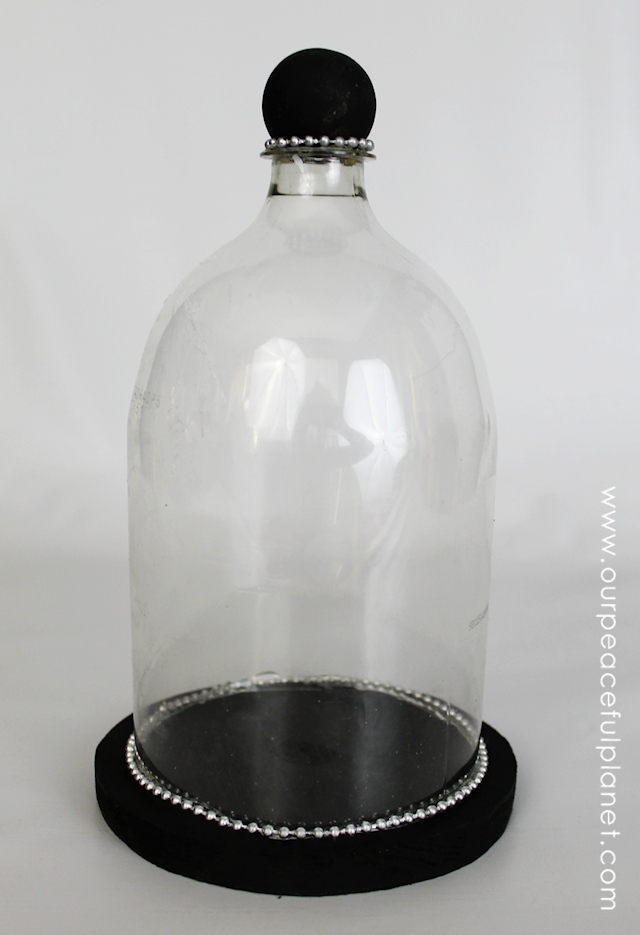
![]() To affix ball apply thin layer of hot glue around lip of bottle. As mine was a little rough cut I added spray painted string beads around the base.
To affix ball apply thin layer of hot glue around lip of bottle. As mine was a little rough cut I added spray painted string beads around the base.

Ready for whatever treasure you wish to place in it!


This is the larger 2 liter bottle with a painted wood handle. I added silver spray painted pearl string around the bottom.
Ideas
Here are a few things we've used our cloches for!
Decor Items & Halloween Specimen Jar Small Dragon Egg Large Dragon Egg