![]()

This post marks the end of a series on our outdated kitchen transformation. There’s ten posts in all, some of them are just fun little things we did to add into the kitchen such as the Little DIY Sugar Bowl and others are larger projects such as a Built in Corner Simple DIY Pantry. This was a very 70’s kitchen with cupboards that had some nasty kind of finish someone had tried to apply and it didn’t quite work out. You might recall I caught a photo of my daughter’s face when she first saw it. Her expression pretty much summed it up. (She helped with a large portion of the make-over). It needed help badly. And me, being who I am, I wanted something fun and unique. And that’s exactly what I got.
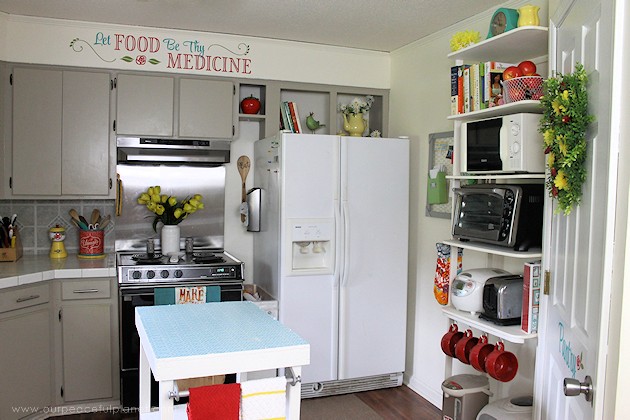
Bear in mind, this transformation is not about a lot of new fancy appliances. Throughout everything, we kept an eye on cost. So the fridge is still the one we’ve had for over a decade and the stove is the one that was in the house when we bought it and badly needs updated. We wanted to show you how you can make what you have look beautiful without spending hundreds of dollars, even if you have to keep older appliances. We gave the stove a facelift and it looks very happy now with some flowers, a new back splash and bright towels on the front.
Never think that you can’t update your home because you have very little money. You’d be amazed at how far a gallon of paint will go! To prove my point, check out our Budget Living Room Makeover and Our Budget Bedroom Makeover. They are full of ideas on how to use what you have and then spend very little on extra’s to makeover a room. And if you’re the type that leans towards the whimsical, such as what we did below, you’ll love our Whimsical Living Room Series!
We start out with four rollover images, ’cause they’re so fun! You can see the room before, then when you rollover the image with your cursor you’ll see the “after” photo. Below that are the rest of the images showing the room from all angels. We did buy a new faucet. That was the only item we replaced.
Before Rollover #1
Hover cursor over photo to see “after” photo. (Page needs to load fully for those with slow internet.)


Before Rollover #2
Hover cursor over photo to see “after” photo.


Before Rollover #3
Hover cursor over photo to see “after” photo.


Before Rollover #4
Hover cursor over photo to see “after” photo.


Regular Kitchen Transformation Photos
Notice that framed photo on the right? That’s the original wallpaper. You can read the cute story about at “Kitchen Keepsake: If These Walls Could Talk”

![]()
We also have a DIY for that Unique Chicken Wire Frame Memo Board you see on the left.

![]()

![]()
As I had limited space for a garbage can Roy made that kitchen rash can on wheels you see and can get the instructions on.

![]()

![]()
The Eat To Live plaques are a Darling Kitchen Wall Decor item made from dollar store plates!
![]()

![]()

![]()

![]()
Yep, that’s just a wire basket I painted white and attached over my light fixture. Luckily it fit perfect!
![]()

![]()


2 responses
The stove certainly looks new! You did a fabulous job with the entire space.
Thanks Lisa. Ü