![]()
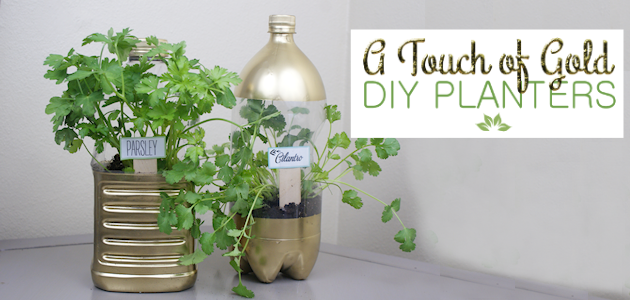
DIY planters never looked so good! But then a touch of gold makes everything better! These are perfect to use for starting plants and especially for herbs on the window sill. In fact we’ve provided a sheet of pretty printable herb markers you can cut out and glue onto craft sticks. Start a few herbs for your neighbor and take them over as a gift complete with the tags! You’ll also want to check out our Metro Modern Self Watering Planters. They are gorgeously unique! And for a little Spring fun make some Heart Shaped Seed Bombs!
DIY Planters Supplies
- Plastic Soda or other Bottles
- Xacto Knife
- Dry Erase Marker (for marking plastic bottles)
- Hair band or rubberband to help mark
- Gold Spray Paint (We used Rust-Oleum 2X Bright Gold)
- Small Filler stones or pebbles. We found some at the Dollar store.
- Masking tape
- Paper towels
- Craft sticks (for plant markers if desired)
- Plant marker tabs below (free download)

Plant Markers Download
pdf
Instructions #1 ROUND CONTAINER
Begin by removing the labels from the plastic bottles of your choice. For the two planters pictured, we used a 2 liter soda bottle and a 2 qt. apple juice bottle. Once the labels are removed, spray the remaining adhesive with Goo Gone and let set for 1-2 minutes. Then wipe away the glue to leave a clean working surface.

Wrap a rubber band around the 2 liter bottle about 1/3 up from the base. Using the dry erase marker, trace around the bottom of the rubber band. Carefully remove the rubber band. This line will be the base line for the three holes you will cut.

Cut a 3 inch circle from a piece of scrap paper. This will be your stencil. Place the circle along the base line and trace it with the dry erase marker.

Repeat this outline two more times around the bottle for a total of 3 circles.

On the average 2 liter, the circles will be roughly 1 1/2 inches apart. 
Cut out each of the 3 circles with an X-acto knife. When complete, simply wipe away the remaining dry erase marker.
 Now we’re ready to paint! For this project we used Rust-oleum Metallic Bright Gold spray paint.

Prepare for painting by wrapping a piece of masking tape around the bottle, just below the cutout circles. Repeat this step just above the cutout circles as well. To ensure that no paint covers the center portion of the bottle, cover the space between your two masking tape rings with a piece of paper or a paper towel.
 Spray paint the top and bottom of the bottle with gold spray paint. Be sure to paint the soda bottle lid as well.
 Once dry, begin prepping for plants by adding pebbles or rocks to the bottom of the bottle. This will provide drainage for your plant.

Cover the pebbles with potting soil. Be sure to leave room for your plant’s root ball.  Insert your plants into the soil through each of the 3 circles and fill the remaining space with potting soil.

Instructions #2 SQUARE CONTAINER
For the apple juice bottle, using the dry erase marker, draw an arched opening on the top half of the bottle. Keep in mind that this opening should be as wide and tall as possible so that you can fit your hand through it in order to insert your plant.

Using the X-acto knife, cut out the opening and then simply wipe away the remaining dry erase marker.

Mask off the portion of the bottle that you want to paint, being sure to cover the clear portion with paper or a paper towel to protect it from over spray. Don’t forget to paint the bottle cap. Once dry, remove the tape to reveal your design. As with the 2 liter planter, be sure to place pebbles or rocks in the base of the bottle prior to filling with soil and plants.

![]()


2 responses
You are amazing! I work at a botanical garden and this year I am trying to develop a 4 day camp teaching 4th and 5th graders how to recycle, reduce and reuse things in their environment. Thank you so much for these articles.
[…] A Touch of Gold DIY Planters from Soda Bottles […]