
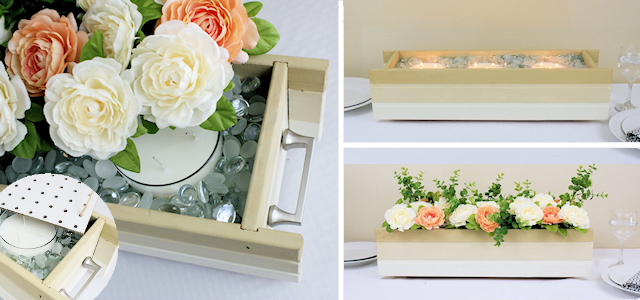
![]() This table centerpiece is our own creation. We call it our “Peek-a-Boo Centerpiece” and here’s why. It’s not only cost effective, as you can change it up for any season or holiday, but get this: <whispers> It has a secret compartment.<end whisper>. You can lift out the pegboard section that holds the flowers and beneath it you’ll find candles that are seated in sand or clear filler marbles; your choice. You then have another lovely style of centerpiece should you want some ambient lighting on your table.
This table centerpiece is our own creation. We call it our “Peek-a-Boo Centerpiece” and here’s why. It’s not only cost effective, as you can change it up for any season or holiday, but get this: <whispers> It has a secret compartment.<end whisper>. You can lift out the pegboard section that holds the flowers and beneath it you’ll find candles that are seated in sand or clear filler marbles; your choice. You then have another lovely style of centerpiece should you want some ambient lighting on your table.
Talk about your multi-purpose piece of decor! And, as is the case with many of our projects here, it’s an upcycle. You can make it from either a plastic or wood flower box. We’ll show you both. Wow! If you need to catch your breath for a minute after all that, I understand. But once you’ve settled down, grab your supplies and get making your own multi-seasonal, secret compartment centerpiece.
If you enjoy unique decor you might also like our Quick & Classy Entryway Shoe Rack & Aromatherapy Plus Frameable Reminder and our Ultimate Pinecone Craft: Stunning Succulent Home Decor.
Table Centerpiece Supplies
NOTE: How much you need of the filler items will of course depend on the size of your flower box.
We used the following amounts:
24″ wood planter: three 3″ candles and 7lb of gems.
15″ plastic planter, three 1.5″ candles and 5lb of sand.
- Plastic or Wood Flower Box, any length (typically comes in 12″ to 36″ sizes)
- Paint
- Candles in glass jars. MAKE SURE THEY ARE NOT HIGHER THAN THE WINDOW BOX.
- Foil
- Sand, Walmart, Craft Stores and some dollar stores carry this. Amazon is comparable to price. If you have access in your area to get it free, do so!
- Glass Filler Marbles
- Tape Measure
- Peg board, cut to fit box. White side (or spray paint that side white)
- Dry erase marker (as it wipes off easily) or pencil
- Handles for ends of wood box. (Plastic box is too thin for handles)
- Drill
- Jig saw or something to cut your peg board to fit.
- Jute twine, (to fit through holes of peg board for lifting handles)
- Candles in Glass for when you lift off the peg board and want ambient light.
 Instructions
(The plastic version is shown at the bottom of the post and uses most of the same methods other than no handle.)
 Measure the interior width and length of your flower box.
 Using the dry erase marker, mark the width and length onto the peg board. To ensure that the peg board piece fits easily into the box, take 1/8″ off of your initial measurements before outlining.
 Connect the marks to create the cut line.
 Using a jig saw, cut along the dry erase line. Wipe away any leftover dry erase marks.
 Cut an 8″ piece of twine. Tie a large knot on one end of the twine. The knot should be large enough that it will not slip through the peg holes.
 Insert the string up through the bottom of the peg board near one corner.
 Slip the twine back down through the peg board near the opposite corner and tie another large knot to create a handle.
 Repeat this step on the other end of the peg board. Cut away the excess twine.
 The peg board should lift easily in and out of the flower box via the twine handles.
 Gather your paint supplies. We opted for a neutral ombre look using three shades of cream.
 Paint the flower box in your desired color.
 Be sure to paint the top half of the interior of the box as this will show when complete.
 Let dry.
 Measure the ends of the flower box to find the center.
 Measure out from the center 1 1/2″ on each side. (This is for a standard 3″ handle). Drill two holes to mount the handles.
 Insert the screws for your hardware.
 Attach handles to both ends.
 Line the bottom of the flower box with foil.
 Begin filling the bottom portion of the box with foil. This provides lightweight filler as well as insulation to protect the box from the heat of the candles.
 You have enough foil filler when the candles rest 1/4″-1/2″ below the top of the flower box.
 Using foil, create long tubes and wrap around the candles; this holds them in place and protects the edges of the flower box.
 Once positioned, fill in any remaining holes with additional foil. The foil should fill the box up to roughly 2″ below the tops of the candles.
 Fill in the remaining space with glass filler marbles in the color of your choice.
 Once full, the foil should no longer be visible.
 Now we’re ready to decorate! We had a great idea from a reader who suggested having several inserts decorated for different occasions and ready to just change out!
 Using wire cutters, cut your desired floral stems down to 3″-4″. Move any leaves up the stem towards the flower prior to cutting.
 Cut additional greenery or accents of your choice.
 Insert the floral stems into the peg board holes as it rests in the flower box.
 Mix and match colors and greenery as desired. The possibilities are endless!
 The floral stems will slide easily into the marble filler below. For spaces above the candles, cut slightly shorter stems.
 When complete, you’ll have a stunning centerpiece that you can easily change out for any occasion! Feel like having a romantic dinner or adding some ambient light to the back porch? Simply grab the twine handles and lift off your floral decor to access the candles.


Table Centerpiece : Plastic Flower Box Version
This uses most of the same steps above except for the handle.
Begin by painting the plastic flower box in your desired color using a spray paint designed to bond to plastic.
 Once dry, fill the base of the flower box with foil.
 When the candles are placed, the tops should rest 1/4″ below the interior lip as this is where the peg board top will rest.
 Fill in around the candles with foil to hold in place and protect the flower box from heat.
 If using sand as a filler, like we did, be sure to cover the candles to prevent filling them with sand as you fill.
(TIP: If your flower box has drainage holes or gaps at the bottom, avoid sand as a filler and opt for the larger marble filler or stones. Sand will fall through small crevices and holes, leaving a trail behind when moved.)
 Fill flower box until sand reaches 1/4″ below the tops of the candles. Shake flower box gently back and forth to allow sand to settle. This will also smooth and level the surface.
 When full, remove the foil caps from the candles.
 Following the steps above, cut your peg board to fit on the interior beveled edge. Decorate with desired floral stems and decor to create a unique & easily interchangeable centerpiece that works year round!
(TIP: Hot glue seasonal items such as Christmas ornaments, Easter eggs & birthday gift bows to toothpicks to create custom inserts for your peg board!)


![]()

![]()


8 responses
Very pretty and a nice idea
I like the idea of making a few extra peg board cut outs so you can have a seasonal or holiday flower arrangement ready to swap out in seconds. They would be easy to store just covered by a plastic bag or in tote box in the closet. Great idea from one Nancy to another.
That’s a brilliant idea. I’m going to add that idea into the post. Thanks Nancy!
You can’t light the candles snd have the flowers in place, correct? Very pretty and so easy to customise to occasion or whim!
Hi Anita! That’s true. It’s one or the other depending on the look you want. Ü
I really like this idea, it is so easy and pretty.
I like to know if this would be a great grave side arrangement
Hi Trina! It would not work for a cemetery I’m afraid as if it rained it would get ruined. It’s mainly meant as a centerpiece that you can change the look of, and it takes a bit of work to make it. Thank you so much for stopping by!