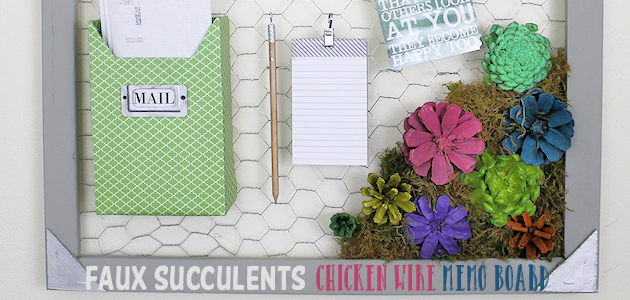
I always wanted a chicken wire frame memo board and when we did our kitchen transformation, I decided to add one into my new kitchen. We’d used chicken wire once before in a really popular Dream Catcher Vision Board but this one was meant to be kitchen oriented, though I throw in a little twist using a pinecone craft succulent craft we did recently. It turned out gorgeous! I even made my own mail holder from a Malt-O-Meal box. The entire thing was a wonderful upcycle project. Fill yours with whatever pleases you!
Chicken Wire Frame Supplies
- Large Frame. We used an old rough wooden one we had lying around.
- 1″ size chicken wire to cover frame 24″x25″ roll
- Staple gun (I own this inexpensive stapler and brad nailer and its great. Manual but strong.)
- Mail Box Metal Label Holder
- X-acto Knife
- Spray Adhesive
- Glue gun
- Felt
- Washi Tape
- Clips with Hooks These are PERFECT for using on your bulletin board and for a variety of other things! We used one to hold our notepad on.
- Pencil with tiny cup hook
- Small white clothespins
PINECONE SUPPLIES
Please visit our Pinecone Craft post for details on making these.
- Pinecones of various shapes and sizes. You’ll be using bottoms and tops.
- Pruning shears or something to cut your pine cones with. They need a longer tip to get inside.
- Paint, acrylic or spray paint (after testing both, spray paint is much easier)
- Moss, if desired for containers
 Instructions
We had an old rough wood frame that we decided to use for our chicken wire frame. Roy cut some chicken wire to fit it.

Then he stapled it in place around the edges.
![]()

We did this backwards and painted it after we put the chicken wire on. 
Next we made our pinecone succulents. It’s very easy to do and we have detailed instructions on our Pinecone Craft post here. 
After our succulents were made and painted, we cut small circles out of felt to attach them to our chicken wire.
Place a large amount of hot glue on the felt circle.
Place it where you will be putting your succulent. 
Push your succulent down onto the felt while pushing the felt with glue onto the succulent. Use something, if needed, to help push the felt so you don’t get burned. 
This shows all of the succulents attached. 
I decided to add moss in between the succulents.
I just poked it down in between and didn’t use any glue. It’s a messy job I suggest you do outside. 
Next, I designed a note pad and pencil to hang on the board.
A tiny hook screw was twisted into the end of the pencil eraser. 
I was painted silver and Washi tape was wrapped around the end.
We covered the top of our note pad with Washi tape to match. 
I was originally going to use a binder clip and somehow rig a hook onto the chicken wire to hold the memo pad. 
Then I remembered I had these awesome Clips with Hooks. They were perfect!
I wanted to have a pouch on my board to hold mail until we had a chance to open it. A Malt-O-Meal box was the perfect size.
I measured it and marked it how I wanted with a sharpie marker. 
Then cut it with an X-acto knife. 
I chose a color of scrapbook paper to cover it with. 
I laid the box on the wrong side of the paper and carefully traced it. 
Then I made two of the main folds. 
At this point I pulled out my spray adhesive and gave the front and sides of the box a quick spray.
Then I pressed the paper carefully onto the box aligning the folds. I decided not to cover the back as it would not show. 
I then proceeded to cut and fold the bottom paper. 
I used stick glue to hold it in place.
Any extra was trimmed off.
On the top side I carefully decided where to make the cuts so I could fold the paper down and glue it into place while trimming away the excess. 
I used a stick glue to do the seams. 
For the finishing touch I added a metal label holder. It was bronze and I wanted silver so I used a little rub ‘n buff on it. 
I glued it onto the front of the box and made a hole for the screws and pushed them through. Then I printed a label that said MAIL on my computer to insert into it. 
I found a plastic hook and glued it upside down on the back of the box so I could hang it on the board. I could have also used felt to glue it on but I wanted the box to be removable. 


5 responses
very nice,thank you so much
[…] Make a Country Kitchen Chicken Wire Frame Memo Board with Faux Succulents […]
[…] one sits on the mantle in my living room. Mr. Cardinal sits on my Chicken Wire Frame Memo Board which, by the way, you can […]
[…] Classy Entryway Shoe Rack & Arom… Darling Dollar Store Plastic Plate Kitchen Wall De… Make a Country Kitchen Chicken Wire Frame Memo Boa… Kitchen Keepsake : If These Walls Could Talk The Ultimate Pinecone Craft: Stunning […]
[…] Make a Country Kitchen Chicken Wire Frame Memo Board with Faux Succulents […]