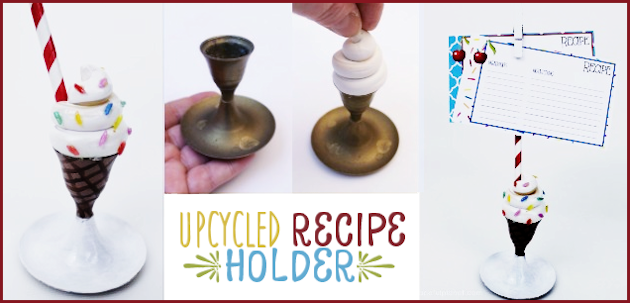
 I’ve tried many recipe holders in my kitchen, the most recent was attaching a clip to my cupboard. The problem is I move around a lot while cooking. I decided what I needed was a portable recipe holder. I also needed one that would hold not only cards but also sheets of paper of various sizes. Well, I found one that does the job and does it with style and it’s got to be one of the cutest upcycles ever! All you need is a small brass candle stick holder that you can find at almost any thrift store. (You might recall that we made a Classy Jewelry Stand from one of the larger ones earlier this year.)
This recipe holder is lightweight and you can easily move it around, and when it’s not being used it looks darling sitting on our counter. Not to mention, talk about a wonderful unique gift! We also have some free matching recipe cards you can print out to go with it.
 Recipe Holder Supplies
- Brass Candle Holder Amazon has the larger type which would still work fine as you can use the base to hold a mixing spoon.
- Large Kabob Stick (To fit inside the straw to give it stability. A very small dowel would also work. )
- Red Paper Straw
- Small Clothespin. We used a 2″ size.
- White Oven Bake Clay (Bakes 15 min. per 1/4″ thickness) I use both Sculpty and Fimo. Both bake up super quick. For one recipe holder you need a small square that comes in a set of colors. Or you can purchase just white.
- Shades of Brown Paint for base (or the cone) Markers can also be used over the base, lighter brown for cross hatching to resemble a cone.
- Hot Glue Gun
- Rice (Painted to make sprinkles!) We used markers to color them.
- Clear gloss spray to give it a nice shine.
Free Printables

Instructions
This is what we started out with! You can find this at many thrift stores. I paid 50 cents for this one.

Gather up a few supplies. 
Roll out your clay to make your ice cream. 
Shape the clay as shown, twirling it around. 
Keep swirling your ice cream around. 
Make it fit onto your candle holder. 
If the straw is strong enough, use it to push a hole into the clay at the angle it will be placed in your ice cream. It needs to go all the way through. You can also use a dowel that is the same size as your straw to make the hole. Now take your ice cream top and bake it in a 275 degree oven for 15 minutes for each 1/4″ of thickness. We baked ours for about an hour. 
While your clay is baking you can paint your base to resemble a cone and dish. The top portion was painted a lighter brown. 
We took some permanent markers and used plastic gloves to help color the rice. We could just roll the rice around between our fingers. If you use water color markers, you won’t need the gloves. Color a few grains of rice whatever colors you wish for your sprinkles. 
Glue your rice on however you want. 
Add lines to the top part of your cone and paint the bottom of your “dish” white.  Glue your ice cream to your candle holder.
Glue a 2″ clothes pin to the top. Make sure to put a coat of gloss over everything. 


![]()

![]()

![]()
![]()


2 responses
This is a great project and how beautiful it turned out. Thank you for sharing at Dishing it and Digging it link party.
This is fabulous, my daughter would love it, as she is the baker now days! thanks for sharing on craft schooling Sunday!