
![]() Have you ever dreamed of having a canopy in your bedroom? Well now you can and its cheaper and easier than you think! In my goal to makeover my bedroom as inexpensively as possible I knew I had to have a canopy of some type. Roy came up with a wonderful way that allowed me to do that and we’ll show you how to make your own inexpensive DIY bed canopy. This is part of our Bedroom Makeover on a Budget Series.
Have you ever dreamed of having a canopy in your bedroom? Well now you can and its cheaper and easier than you think! In my goal to makeover my bedroom as inexpensively as possible I knew I had to have a canopy of some type. Roy came up with a wonderful way that allowed me to do that and we’ll show you how to make your own inexpensive DIY bed canopy. This is part of our Bedroom Makeover on a Budget Series.
![]()
![]()

Supplies Needed For Inexpensive DIY Bed Canopy
Supplies For our QUEEN sized bed we used the following:- 3 ea. 8ft boards (1”x2”s)
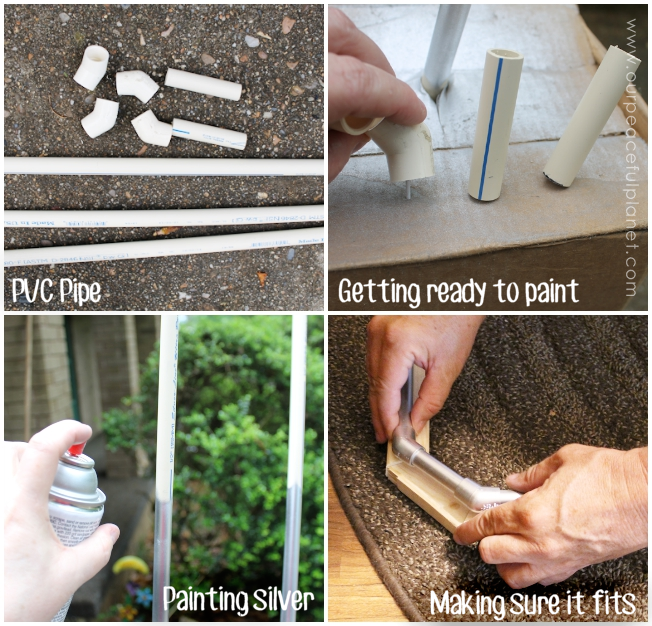
- 3 ea. 8ft pieces of PVC pipe (1/2”)
- 4 ea. 45 degree PVC connectors
- 8 ea. Mounting hooks (J Hooks) These need to be just large enough to hold your PVC pipe. Ours were 1” wide on the hook itself and approx. 3 ½” long from the bottom of the hook to the tip of the thread. Measure them to your PVC pipe to make sure they fit.
- Toggle Bolts OPTIONAL but if you can't hit studs in the ceiling where you'd like to you can use these instead. Keeping in mind this is to hold very light sheers.
- Sheer Curtains
- Wood: Side pieces cut 6’10” End piece cut: 5’2”
- The PVC was approximately the same. MEASURE YOURS WELL! The corner diagonal pieces on the PVC were approximately 3 3/4”.
- Sheers. Make sure the rod pocket is large enough for your PVC pipe to go through! We used 4 sheers, one per corner. Using double that amount will make for a fuller canopy.
 Optional Toggle Bolts. These can be used to mount your frame to the ceiling if you can't hit studs as described.
Cost
- Pipe, hooks and 1”x2” wood strips. Total Cost: $12.
- Four Sheer White Panels $4.91 each at Walmart
Printable General Instructions
pdf format

[sdm_download id="18532" fancy="0"]
![]()
Visuals




Final Notes
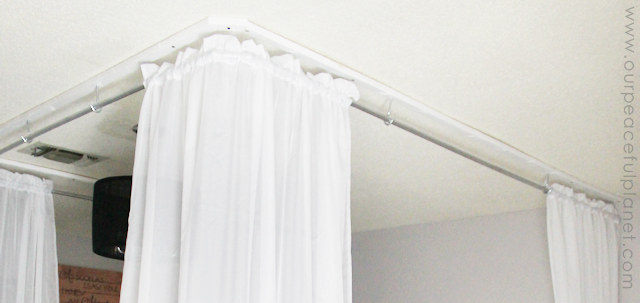
After the canopy had been up for a few days I decided I wanted an extra sheer on the bottom corners. It looked beautiful as it was (which all the photos above show) but I wanted more fullness. As you can see in the picture directly above the end corners have just one sheer that wraps around. We had to use some fishing line to brace the corners up as they were sagging a tiny bit so we pulled it through the one sheer using a big needle and then tacked it to the top wood frame using a thumbtack. Once we added the extra sheer we had one on each side that met in the middle of the corner. This made it easier to use our fishing line brace. Though if you have the two sheers you could also add a normal brace on the corners if desired.






12 responses
Beautiful ! What a great, romantic feeling to your bedroom. So simple too, you and your hubby make a great team !
You’re so welcome Diena!
[…] If you’ve recently completed a plumbing project and found yourself with extra PVC pipe, use it to make this inexpensive bed canopy. […]
[…] If you’ve recently completed a plumbing project and found yourself with extra PVC pipe, use it to make this inexpensive bed canopy. […]
[…] old fashioned ceiling fan in the room. Roy had to remove the blades from it in order to put up our DIY Bed Canopy. I had an old black hanging lamp that had been in storage for a few years. It was perfect for the […]
Love it!
How pretty and you made it look doable, what a fun project!
Thanks for stopping by Carlee!
What a beautiful job you did on this – thanks so much for the tutorial – pinning !
( saw you over at French Country Cottage )
You’re so welcome Suzan. Thanks for visiting and commenting!
This is such an amazing idea! Thanks for sharing it. I’m Anita visiting from Artsy-Fartsy Link Party.
Thank you Anita. Ü