![]()
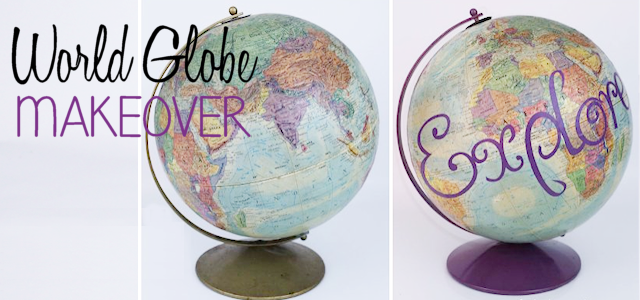
I love globes and I’ve seen some of the awesome makeovers people have done with old ones. So I hit eBay looking for one I could purchase and re-do. Ends up even used ones in poor shape were pretty pricey. But I kept checking and eventually found one that I was able to snag fairly reasonably. My plan was to do a full makeover, painting over the globe and adding letters. However, when I received it I realized the globe itself, though old, was in really good shape. I couldn’t bring myself to paint over it. So my major makeover turned into a minor one. But I’m very happy with the result and changes I made while maintaining the integrity of the actual globe itself.
If you’re a skilled painter (I’m not) you could paint on the words. You could also print and cut them out of regular paper and glue them on. I used my Silhouette Portrait to print the letters on self-sticking vinyl. I LOVE that little machine! I’ve included the Silhouette file I used for those who own that machine plus a plain text version of my letters for those who want to cut out the letters by hand.![]()
Supplies Needed
- An old globe. 12″ is the standard size. (Diameter of the ball.)
- Letters cut out of vinyl or paper. These need to be fairly thin so they will lay on the curved surface and not buckle. (If using vinyl you can make it easier with a cutting tool such as the Explore Air 2.)
- Mod Podge (I didn’t use this but it would be a good finish over an old globe.
- Spray Paint
- Sand paper if needed for rust.
- Stick glue or spray adhesive for letters you cut out.
 Download
You can of course use any word you wish on your globe. However, if you’d like to use the same one that I did you can download the text for the word “Explore” below as a pdf that you can cut out. For those who might have a Silhouette machine there is also a file for that! My text fits a 12″ globe.
![]()
“Explore” Text (pdf)

![]()
“Explore” Silhouette Format (zip file)

Instructions
The first thing I did was to take apart the globe. The top disc had the north, south, east and west direction markers listed on it but it was too rusted to restore so I painted over it. Though the globe was a bit yellowed it was in wonderful shape with no tears on the surface. This is why I decided to clean it up and keep it as is.

![]()
The metal base was rusted in places. I sanded some of the rougher spots with a sanding sponge then cleaned it up. There was also a dent in the base which I hammered out. It wasn’t perfect but because of the location it wouldn’t show anyway. I then painted all the metal parts. I suggest using Rust-Oleum or something similar. l chose a color that was pulled from some of the contents on the map.

![]()
I wiped off the globe with a damp paper towel. I thought about coating it first in Mod Podge to help protect it but with it being yellowed I wanted the option to try and figure out how to brighten it up later. Because I was using removable vinyl I could do this. I cut out my word of choice “Explore” on my silhouette printer on some vinyl that matched my color choice. If you’ve cut out your letters by hand you would glue them on at this point. Stick glue or spray adhesive would work great for this.

![]()
Before and After
![]()


19 responses
Thanks again for sharing this post at Seasons on Saturday link party! So come by tomorrow and grab your button!
Abbi @ http://www.seasonsofahomemaker.com
You’re welcome Abbi. Ü
Just wanted to stop by and let you know that we loved this link so much from last week’s #HomeMattersParty that we chose it as one of our features THIS week! We’d love for you to come check it out – the door is open! http://theroadtodomestication.com/2015/04/17/home-matters-linky-party-33/
Thank you so kindly Kristen. I’ll share the link on all my social networks!
What a great idea! I love your step-by-step tutorial.
Thanks Kathleen. Ü
What a great project! Love how you updated your globe! We never would have thought to paint the base – wonderful job! We would love for you to link this up at our Something To Talk About Link Party…our readers would love it!
Thanks Vicki and Jennifer. I’ll check out your party!
I love this! What a fun idea!
Love it…I so need a silhouette!!
They are awesome machines for sure!
Explore is an awesome word to pick for the project. Sums it up nicely.
I thought so too! Ü
I absolutely love this idea! It really makes the globe stand out and can really bring the theme of a room or office together!:) Thanks for sharing at the Home Matters Linky Party! We hope to see you next week!
Thank you Sharlee!
What a fun project! I love the pop of color you chose for the base and lettering! Pinned! I’d be thrilled if you shared this at my Creative Ways Link Party! It’s live on the blog right now. Hope to see you there! Have a fabulous weekend!
Blessings,
Nici
Thanks so much Nici!
Love this!
Thanks!