
![]()

These are so cozy and feel so good against your skin and it only takes about 20 minutes to whip up a pair. You can adorn them however you wish with buttons, ribbons, appliques etc. Fleece comes in a huge variety of colors and patterns so you could literally have a wardrobe of arm warmers. I use them in the early winter mornings as I keep my house a bit cool. I almost don’t want to take them off when it warms up!
I sewed the sides on my sewing machine but I ended up sewing the hems by hand as I liked the look much better. Because you are working with fleece you don’t actually need to hem them as you can see in the example of the pink arm warmer below. There is a free download of the pattern that also includes the instructions. ![]()
Materials Needed
- Download the pattern provided below. This is for a normal size adult female arm. You can adjust it if needed.
- 1/2 yard stretchy type fleece.
- Buttons or anything else you’d like to adorn them with.
- Scissors / Thread / Sewing Needle / Sewing Machine
![]()
PATTERN DOWNLOAD

Instructions
 Cut out your pattern. Tape the bottom part onto the top pattern. (You can make shorter ones if you prefer.)
Cut out 2 sets from your material. The pattern is made for a 1/3″ to 1/2″ seam allowance. You can adjust if needed.
NOTE: As fleece is so cheap I actually made a test arm warmer to make sure they would fit OK and see if I needed to adjust the pattern.
Sew the sides together and the area between the thumb and hand opening. Trim the inside seams to about 1/4″ to reduce bulk.
NOTE: When sewing the thumb opening you may want to make that one about 1/3″ and taper out as you sew down the sides. It’s a fairly close fit. You can always take in a little more if needed.
After sewing the sides and small area between thumb and hand opening turn the warmers inside out.
HEMMING: These can be hemmed by machine, by hand or left raw. I decided to hem mine by hand on the thumb, hand and arm opening. I had tested doing one with the sewing machine and didn’t care for the look near as well as the hand hem. You also have the option to not do a hem as fleece does not ravel. Just cut off about 1/2″ from all openings if you decide to keep the raw edge.
![]()
Visual Steps
NOTE: I’m not a seamstress by any stretch of the imagination. So you may know easier or more professional ways to do some of these things. Please adapt to your own skill level!
Tape pattern piece #2 onto the bottom of pattern piece #1. 
![]()
Layout your pattern on folded material and cut 2 sets out. 
![]()
Sew sides of arm warmers and also the little V shape area between the thumb and arm opening.

![]()
Trim seams to about 1/4″ to reduce bulk.

![]()
After sewing edges.

![]()
You can hem the three openings in various ways or leave them raw as fleece does not ravel. I chose to hand hem mine as I preferred that look the best. Choose whatever method you like. (The thumb piece will be tricky to hem on a machine due to how small it is. Hemming it by hand was much easier.)

![]()
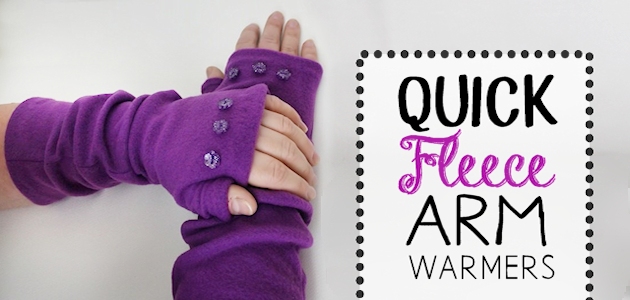
You can decorate these in a variety of fun ways. I left my black ones plain and added three buttons to the purple set. But use your imagination! 
![]()
Completed arm warmers.

![]()

![]()

![]()

![]()
This shows one that I left the edges raw. Just make sure you cut them really straight for this method.

![]()
![]()
This Article Featured At
Delightful Made
Titi Crafty


49 responses
OH MY! I just discovered these and am head over heels in love with them! So far, I’ve made them for my daughter and myself, then I scaled it down and made a pair for my 3-year-old granddaughter who won’t take them off. I’m planning on making a whole bunch more for Christmas gifts this year. Thanks for sharing such a great pattern and idea!
I’m always so thrilled to hear things like this Amy. I’m so glad you enjoyed them!
I can’t get the download to work! Help!!
It would be great if you showed this pattern on graft paper. It would make it easier to make a pattern.
If there is no charge for validating your account (to get free patterns) why would I need to enter my credit card information??
There is no charge Mary. You may have clicked on an ad link rather than the download link I provided. We have ads on our site. But ALL my downloads are free and should just download. Click the GREEN BUTTON that says Download Now!
I want to thank u for this free pattern, Where I live its cold and these will be perfect to keep my hands/lower arms…
I love this idea. It would make a great inexpensive project for the kids to help with and give out to the shelters and any homeless people you may encounter this extremely cold winter. You could hem these before you sew the side seams so you wouldn’t have to worry about the tiny openings.
Hello Terri
That’s a fantastic idea in general regarding the homeless people.
As for your idea in sewing the hems before sewing the side seams I also thought of that idea as well. Two great sewing minds ;-).
From
Cee Jay
Very true Terri. I’m not a sewer but these are so easy to make.
[…] Quick Fleece Arm Warmers Tutorial […]
Hello, and Greetings from Britain!
I have just downloaded and printed out your pattern (it didn’t say if it should be printed out ‘Normal Size’ or ‘Fit to Page’, so I chose ‘Fit to Page’).
I’m definitely going to ‘play around’ with this and make a prototype first because I don’t think I’m going to need any or all of Pattern 2. I’ve worked out it will go up to my elbow and past a bit! Still – it will keep me warm ;-).
I’ve got the fleece in mind and when I’ve made them I will try and show them to you when completed.
Thank you for your time in designing the pattern and the tutorial.
Have a great day.
Cee Jay.
Hi Cee Jay! I’m so glad you enjoyed that post. I should probably put “fit to page” on there… most times it does not matter but it can in certain situations. Thanks so much for the kind post! Good luck!
I made these for some teachers, In bright colors. The students loved them, so soft to feel.
How fun! Yeah they feel great. Glad you enjoyed them Lenna!
[…] had some left over fleece from another project (i.e. arm warmers) and I wanted to use it somehow. This stuff is SO soft and comfortable against the skin that I […]
[…] January is National Hobby Month, why not learn a new hobby? If you’ve thought of sewing, sign up to learn how to make simple fleece fingerless mittens/arm warmers. We will have sewing machines all ready, and provide materials to make your own pair from this pattern: http://ourpeacefulplanet.com/2014/11/10/quick-fleece-arm-warmers-tutorial-pattern/ […]
[…] 링크 http://ourpeacefulplanet.com/2014/11/10/quick-fleece-arm-warmers-tutorial-pattern/ […]
I love this pattern – thank you! This would be a fun girl’s night craft party as they are so easy to make, and so easy to decorate and make your own.
So glad you found it useful. They are super easy to make and would be perfect for a girls night!
I play recreational volleyball and I find that the ball hits the bony part of my wrist when I do the arm passes and serves so I figured that these arm warmers would do the trick for easier play. I can make these the same way as above but do a layer of fleece, a layer of quilt batting and then another layer of fleece to add padding to the arm and hand area of the mitts to turn them into arm pads. I bought this red and white Canada fleece so I might make a pair of these arm warmers/pads so I can play volleyball with my dad at the downtown recreational centre.
Oh wow… what a great idea! I hope it works out well for you. Thanks so much Mikayla for commenting!
I saw the high school’s volleyball coach in Kenora last Friday and told him about these mitts. He said that he will be coaching girls volleyball next semester so I plan on making about 20 pairs of padded arm pads for volleyball using your pattern.
You’ll have to take a photo of them and either send it or put it in a new comment. I’d love to see them!
Thank you for sharing this pattern! I could use a pair of these on cold days. I’ve got a Craft Gossip post that links to your free pattern here:
http://sewing.craftgossip.com/tutorial-easy-fleece-arm-warmers/2014/12/30/
–Anne
Your so welcome and thank you SO much Anne for featuring me on your site!
Brilliant – thank you!
Why thank you Kate. Ü
Fantastic!
so lovely!! thanks for sharing the free pattern. Thanks for sharing this at the Create link Inspire party. it’s being featured today at Nap-Time Creations… I’ve shared it all over my social meadia.. i’d love any reshares you could do, thanks! Emily
I so appreciate that Emily! When I’m featured I always put your link on the bottom of my post and I share it on my social media with a big thank you!
Thank you for sharing this! I’ve been coveting the knitted hand/arm warmers in Outlander but I can’t knit! Now I can make my own 🙂
lol! There is something mystical about them isn’t there?
These are so cute! I love how slouchy they are:)
Thank you Ginnie! Ü
Hi stopping by from the Sna@p linky party. These are gorgeous and I’ve pinned the project. I really love the addition of buttons on them. Thanks for sharing! x
Your so welcome. Thank you Jennifer for visiting and repining!
I love these- so cozy. Is it wrong that part of the reason I want fingerless gloves is so I can still use my cell phone? Hahahha. 🙂
LOL! Hey, I love mine because I can work on my computer with them. Ü Thanks so much for stopping by and commenting Laura!
Very nice! Thanks for the free pattern, this will be a quick and easy project. I can make a pair for me and my daughter using the remainder of my fleece hoard from last winter.
Your very welcome Patricia. I’m so glad you found it useful. Thanks so much for visiting!
totally awesome pattern! love all the colors you made and such a great idea – an arm warmer for every outfit!
Thanks Kristina and Millie! I love the idea of a wardrobe of arm warmers too! Appreciate you stopping by. Ü
Love these! Thanks for sharing! Also wanted to let you know about a new linky party starting this Saturday at 8pm called “Found & Foraged” Can’t wait to party with you at http://www.houseofhipsters.com
What a great (and easy!) gift idea. Love the addition of the buttons to dress them up. Thanks for sharing the pattern!
Thanks so much for the tutorial. These are awesome, and I can use a pair this winter!
Your very welcome!
Pefect for all those texters out there! I’ll be pinning this to my free patterns board 🙂 thanks sharing at the Make it Monday on Etcetorize!
I appreciate that Tamara!