
![]()
 I just bought a unique car that’s all mine and its so me. Since my car matches who I am so we well I wanted to decorate my keys to do the same. I only have three keys on my keyring but I have a ton of bling. My keys were kind of bleh in a sea of awesomeness.
The key that goes with my car has a chip in it so it has an extra large plastic grey end. Not very pretty and a challenge to make look nice. Another key is a house key which would be simple to decorate. But my third key is an official post office box key and I can’t do anything permanent to it. I found a way to fix up each one. Below are the simple instructions.
Vinyl sticker I created for the back of my car. It's a reference to the fact I play World of Warcraft.

Tools I Used
- Nail Polish
- Spray Paint
- Colored Duct Tape
- Precision Scissors
- X-acto Knife
- Glitter
- Fake jewels
- Felt
- Clothespins for holding.
Clothespins allow me to hold items while I paint and also paint both sides at the same time. Then you can sit or balance them while they dry.

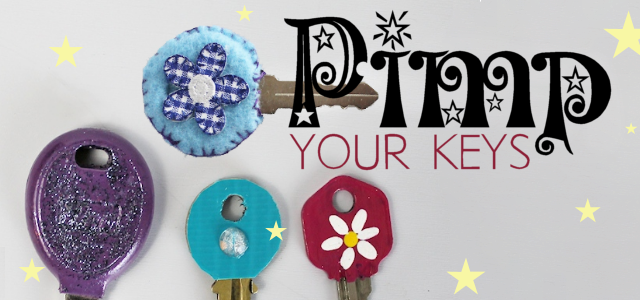
Standard Nail Polish Treatment
This idea can be found all over the web and is the status quo for decorating your keys. You can get nail polish in a huge array of colors including some with glitter. It works well and is fairly durable. I added a little flower flourish on each side with regular paint then coated it with gloss to protect it.

Spray paint on keys with large plastic ends.
This is my key for my new car. It has a large rubber type end. I taped off the key part and spray painted it. I then coated it a little with Mod Podge and added some glitter and sprayed it with gloss to protect it.

Glitterizing Keys
I painted my keys first with a color similar to the glitter. You don't have to do that though. Then glue, spread, sprinkle and dry. After drying rub or brush off loose glitter before sealing.

After completely dry and brushed off add a semi-thick coat of Mod Podge to seal the glitter on. 
A Post Office Box key. (Removable)
I was wondering how I would decorate this key when I was not allowed to paint it. I tried Washi tape at first but its not sticky enough. I then realized I had some colored duct tape. it was perfect! I pressed a piece on one side at a time and trimmed the outside with precision scissors. I used an X-acto knife for the hole. I then glued a little jewel on each side with epoxy.
Duct Tape is the perfect thing to decorate your keys in a temporary way. 
Stick you key on and cut with precision scissors. Repeat on other side.

Use a VERY sharp X-acto type knife to cut out the hole.

Glue on any decoration you wish or just leave plain!

Felt Covered Key (removable)
- Cut two pieces of felt with about 1/8 th of an inch extra around the edge.
- Blanket stitch the edge partway around.
- When there is about 1/3rd an opening left slide in your key and finish stitching.
- You can stitch the bottom open edge of each side if desired.
- Decorate however you want! I had an applique I glued.

Before and Afters


Some of my newly pimped out keys on my keyring. FYI The little owl us a USB drive. Ü
More Keys On Key Fobs I Made


One response
[…] Pimp Your Keys : Plus Removable Bling! […]